21Likes 21Likes
 |
|

8 May 2020
|
|
Contributing Member
Veteran HUBBer
|
|
Join Date: Sep 2018
Location: Belper, uk, EUROPE
Posts: 575
|
|
|
The rods have arrived and they seem pretty easy to use. Surface prep is important as has been noted by others - the kit I bought cam with a toothbrush sized stainless steel wire brush - the brush is very abrasive on aluminium.
Points to note so far:
The size holes you can fill is limited to about 8mm diameter in my very limited experience and as you move towards 8mm the thickness of the covering gets thinner so ends up more like a film towards the bigger holes so if pressure is involved for big holes forget it. I think I would braze a patch of aluminium over the hole if bigger than, say, 5-6mm.
If I was to be putting a patch over a large hole then I would prepare the surface around the hole and the the patch. Apply the rod to form a “puddle” around the hole and then do the same thing for the patch contact area. Finally heat the patch and hole area to get the puddles liquid so that the patch can be placed over the hole sealing it.
Ensuring the piece stays still during the cooling process is important as the filling metal stays liquid longer than I expected. My fault entirely.
For a butt joint it is better to have access to both sides of the joint to put a “weld” bead down both sides.
You can easily make smooth looking joints easily and they seem to be relatively strong - it is NOT welding so it is weaker but it could be a simple remedy to carry out a bodge repair until such time as a proper repair can be done.
The rods are lightweight and don’t take up much space so I can see myself taking some on a trip - the heat source can be from a plumbers torch so should be simple to obtain locally.
I still plan on doing a video but that will have to wait for a quiet day at work and some time to prepare samples.
|
23 May 2020
|
|
Registered Users
Veteran HUBBer
|
|
Join Date: Apr 2005
Location: Oxford UK
Posts: 2,116
|
|
So which one did you buy then? Maybe you could give us some tips about welding. 
|
30 May 2020
|
|
Contributing Member
Veteran HUBBer
|
|
Join Date: Sep 2018
Location: Belper, uk, EUROPE
Posts: 575
|
|
Quote:
Originally Posted by backofbeyond

So which one did you buy then? Maybe you could give us some tips about welding. |
OK. Tips about welding with these rods.
1. Preparation is key
2. They have their place but not for something structural
3. I am rubbish at welding, these make me look good and allow an even line to be made. Sometimes, in my case - definitely not every time - so the tip is don’t ask me to do it for you
4. The rods could be used to cover over a small - up to 7mm say - hole but not to any great pressure.
5. I will use them to seal up the corners of my pannier lid - non-structural and could be made to look pretty good.
6. Powder coating goes over the top as if it were normal metal (which it is of course being an aluminium alloy)
I still have to edit the video I made but have yet to have any time to do it.
__________________
You will have to do without pocket handkerchiefs, and a great many other things, before we reach our journey's end, Bilbo Baggins. You were born to the rolling hills and little rivers of the Shire, but home is now behind you. The world is ahead.
|
31 May 2020
|
|
Registered Users
Veteran HUBBer
|
|
Join Date: Apr 2005
Location: Oxford UK
Posts: 2,116
|
|
|
I'll look forward to the video as it sounds as though it went reasonably well for you -if a little hit or miss. What did you use as the heat source?
|
31 May 2020
|
|
Contributing Member
Veteran HUBBer
|
|
Join Date: Sep 2018
Location: Belper, uk, EUROPE
Posts: 575
|
|
Quote:
Originally Posted by backofbeyond
I'll look forward to the video as it sounds as though it went reasonably well for you -if a little hit or miss. What did you use as the heat source?
|
I used a gas burner we use at work for cleaning off hooks which have acquired too much powder coating - I have a powder coating factory. It would be fair to say it isn’t too subtle and that may be the reason I have been - as you say - a little hit and miss. I used that as it was to hand.
I do have a nice neat torch that is far more appropriate for most applications - it is similar to this one https://www.screwfix.com/p/rothenber...ignition/82945 - when I do my pannier lids I will use that torch.
One thing that I should point out is that using too much heat affected the strength of the samples I used as the process annealed them softening the aluminium. Hopefully with a more delicate torch, and touch, the lids won’t anneal - this will mean having to get it right first time on each corner.
__________________
You will have to do without pocket handkerchiefs, and a great many other things, before we reach our journey's end, Bilbo Baggins. You were born to the rolling hills and little rivers of the Shire, but home is now behind you. The world is ahead.
|
2 Jul 2020
|
|
Gold Member
Veteran HUBBer
|
|
Join Date: Jul 2008
Location: London
Posts: 405
|
|
Having joined in Ted's 'Aye' thread and read about FB v. HUBB, I thought maybe HUBB needs a bit more traffic with bumped threads.
So I'll share an ancient anecdote about aluminium welding. (Or soldering I suppose.) Pass by if old stories aren't your thing...
At the 1970 TT (as a spectator) I had an 'incident' just before practice week started, the alternator cover of my bike slid along the road a bit, wearing a hole right through it. 
I was staying with friends and a couple of competitors who said, "No probs, take the cover off and I'll give you a lift to the Reynolds garage. Ken Sprayson will weld that up in a jiffy."
There was a bit of a queue, with competitors and mechanics with all sorts of stuff for repair. It was an education to see Ken repairing everything that was presented to him. Pretty much all steel stuff.
Then I offered my aluminium cover, with quarter-inch hole in it, the surrounds of which were very feather-edged, out to over 2-inch diameter.
"You lads don't half bring me some stuff, don't you!" he exclaimed.
I suppose he must have changed from acetylene to something else, and first 'tested' the feather edge to see how readily it melted, noting how the hole grew, spending a short while in deep thought. Selecting a rod (aluminium I assume) he set to, gingerly depositing blobs of ali weld/solder on to the feather edging. Sort-of playing with it to just melt bits of rod and a smidgen of feather-edge, growing the thickness until the hole was completely filled. Don't remember if he used a flux and definitely don't remember how he stopped it oxidising.
It looked a magnificent repair and he seemed very satisfied with it.
"Where did it happen?" he asked.
"Approach to Braddan Bridge," I had to confess.
"Don't do it again!"
As I turned to leave I was amazed at the size of the huddled queue that had been studying his artistic work.
A while ago he published his second book of TT photographs - he's quite a serious photographer.
The front cover carries a photo of - the approach to Braddan Bridge, with Mick Grant sweeping through. I'm sure there's no connection, but it's strange what coincidences occur in life.
His repair was long-lasting, it was quite a while before I fitted a new cover. And very sadly, I probably scrapped the old one that he repaired.
"What a stupid thing to do!" I thought when I first saw the front cover of his new book...
|
1 Mar 2021
|
|
Contributing Member
Veteran HUBBer
|
|
Join Date: Sep 2018
Location: Belper, uk, EUROPE
Posts: 575
|
|
|
I ordered some more "welding" sticks from eBay - to be honest, they were rubbish compared to the ones I got last time. The temperature that they needed to melt was above the melting point of the material (aluminium) I was trying to join. I will be getting some more from the original supplier as they do what is expected. I was less than impressed by the two different sorts I bought off eBay- I know, get them from a known source.
The first difference between the sticks that I noticed is that both new (rubbish) ones (different sizes and suppliers) were significantly shinier than the originals which were a completely flat matt finish compared to glossy for the new ones.
It may be that the new ones will be fine with higher melting point materials (probably not carbon steel though stainless has been mentioned as a possible material it can join - yet to be tried by me).
When I get more of the original sticks in I will try to get some decent footage for a video and then find some time to edit the video such that it is too the point - the first attempt had a combination of poor camera work and far too long. The thing is that there is great potential for the sticks to be useful to me where I work and be small enough for me to slip a few into a pannier / tool tube to do repairs on the road (getting a heat source from someone else) - I just need to be sure that the sticks do what they say they will do - the second lots just didn't.
__________________
You will have to do without pocket handkerchiefs, and a great many other things, before we reach our journey's end, Bilbo Baggins. You were born to the rolling hills and little rivers of the Shire, but home is now behind you. The world is ahead.
|
24 Nov 2021
|
|
Registered Users
New on the HUBB
|
|
Join Date: Nov 2021
Posts: 1
|
|
Aluminum is a rather complex metal that is difficult to heat treat. The most reliable welding method is argon welding. During welding, argon prevents aluminum from oxidizing by displacing oxygen. Before you do any work on aluminum, think about the quality of your welding machine. It will directly affect the quality of the welds. I bought my welder from this site https://ratemywelder.com/best-miller-welder-reviews/. For many years it has not let me down. If you want your work to last, then I advise you to choose a good welder intelligently. Fifty percent of the result depends on it.
Last edited by maxauthor18; 26 Nov 2021 at 14:03.
|
2 Dec 2021
|
|
Registered Users
Veteran HUBBer
|
|
Join Date: Apr 2005
Location: Oxford UK
Posts: 2,116
|
|
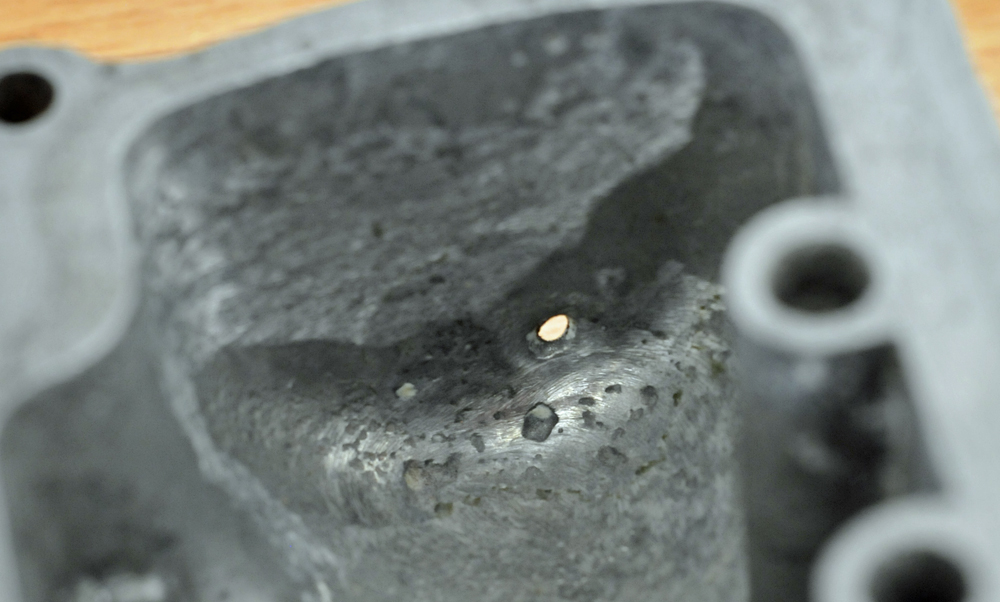
Where are we with this one? Anybody actually tried repairing an aluminium casting with them? I only ask as I've got a hole in a carburettor float bowl to block up and all my 'easy' options (epoxy etc) have all failed.
I've seen a few YouTube videos of 'miracle fixes' but also a few where the casting melted before the fix worked. As my chances of getting a replacement float bowl (it's from a 51 yr old bike) are close to zero I don't want to put this one at risk. An expert might be able to do it but you need skill that counts me out.
|
2 Dec 2021
|
|
Registered Users
Veteran HUBBer
|
|
Join Date: Mar 2018
Location: Portugal permanent, Sweden during summer
Posts: 486
|
|
|
Aluminium repair
I have used these types of rods.
No to fill holes. But to repair cracks in engine covers.
Like covers over generator, clutch, ignition.
On old bikes that were projects.
And it worked well.
I could get the cracks repaired.
After grinding and polishing, it looked ok.
The colour of the repair is not exact the same...
But it worked in the so that the covers could be used.
And looked good, but not perfect
|
3 Dec 2021
|
 |
Contributing Member
Veteran HUBBer
|
|
Join Date: Jul 2005
Location: Wirral, England.
Posts: 5,681
|
|
Quote:
Originally Posted by backofbeyond
Where are we with this one? Anybody actually tried repairing an aluminium casting with them? I only ask as I've got a hole in a carburettor float bowl to block up and all my 'easy' options (epoxy etc) have all failed.
I've seen a few YouTube videos of 'miracle fixes' but also a few where the casting melted before the fix worked. As my chances of getting a replacement float bowl (it's from a 51 yr old bike) are close to zero I don't want to put this one at risk. An expert might be able to do it but you need skill that counts me out.
|
Usually I would offer that you send that to me and I'd TIG weld it for you for the price of a  .
But your bowl looks very pitted and crumbley. I would look for a replacement.
However, not easy in the classis bike world.
For that, I would do the same repair as a old fuel tank. With a brazing rod and MAP gas. Your bowl doesn't look like it would survive a TIG torch. Especially as it looks very porous. It would likely be deep contaminated with fuel and impossible to clean or grind down to virgin material.
Brazing rods are cheap and will work well on your carb. Look at videos on YouTube for classic fuel tank repairs with brazing.
__________________
Did some trips.
Rode some bikes.
Fix them for a living.
Can't say anymore.
|
3 Dec 2021
|
|
Registered Users
Veteran HUBBer
|
|
Join Date: Apr 2005
Location: Oxford UK
Posts: 2,116
|
|
|
Thanks for the info Ted. It’s not quite as bad as it looks in the photo - the angular lighting makes the pits look like craters - but the area around the hole does have a few marks. To get a hole something must have attacking the metal and where one hole has appeared others must be on their way. From where it is - down on one side of the bowl - I suspect the bike was left at an angle on the prop stand and whatever was in there has had plenty of time to act on the metal.
It’s a VM26 Mikuni so you’d think parts should be easily available but the current stuff is a slightly different shape casting so the new bowls won’t fit the old style body. I’ve been looking out for a second hand replacement for some time but nothing has come up, so trying to figure out the best way to repair this one is now where I’m at. There’s plenty of bodge methods but I’m reluctant to go down that route.
I’ll check out brazing on YouTube but its been a while since I brazed anything so a bit of practice probably wouldn’t go amiss.
|
3 Dec 2021
|
|
Contributing Member
Veteran HUBBer
|
|
Join Date: Jul 2005
Location: Wirral, England.
Posts: 5,681
|
|
Quote:
Originally Posted by backofbeyond
Thanks for the info Ted. It’s not quite as bad as it looks in the photo - the angular lighting makes the pits look like craters - but the area around the hole does have a few marks. To get a hole something must have attacking the metal and where one hole has appeared others must be on their way. From where it is - down on one side of the bowl - I suspect the bike was left at an angle on the prop stand and whatever was in there has had plenty of time to act on the metal.
It’s a VM26 Mikuni so you’d think parts should be easily available but the current stuff is a slightly different shape casting so the new bowls won’t fit the old style body. I’ve been looking out for a second hand replacement for some time but nothing has come up, so trying to figure out the best way to repair this one is now where I’m at. There’s plenty of bodge methods but I’m reluctant to go down that route.
I’ll check out brazing on YouTube but its been a while since I brazed anything so a bit of practice probably wouldn’t go amiss.
|
Brazing is done at a much lower temperature. So easier for DIY and it's less stressful on the material. It's a capillary action. It was good enough for motorcycle frames before industrial welding became mainstream. It's the 'Go to' repair for thin or delicate materials. You could even lead/tin or silver solder that hole although brass would be better. Getting the material as clean as possible (lightly sand with a soft dremel etc) will yield the best results.
__________________
Did some trips.
Rode some bikes.
Fix them for a living.
Can't say anymore.
|
4 Dec 2021
|
|
Registered Users
Veteran HUBBer
|
|
Join Date: Apr 2005
Location: Oxford UK
Posts: 2,116
|
|
24hrs is long time, not only in the world of politics, but also in the worldwide search for ancient carburettor parts. After finding nothing for the best part of a year I've found one float bowl for sale and had the offer of another for free. So, when the first of them arrives, I'll rebuild the carburettor and get the bike running. I can then have a look at brazing the hole in the existing one without fear of getting it wrong. 
|
|
Currently Active Users Viewing This Thread: 1 (0 Registered Users and/or Members and 1 guests)
|
|
|
 Posting Rules
|
You may not post new threads
You may not post replies
You may not post attachments
You may not edit your posts
HTML code is Off
|
|
|
|

Check the RAW segments; Grant, your HU host is on every month!
Episodes below to listen to while you, err, pretend to do something or other...

2020 Edition of Chris Scott's Adventure Motorcycling Handbook.
"Ultimate global guide for red-blooded bikers planning overseas exploration. Covers choice & preparation of best bike, shipping overseas, baggage design, riding techniques, travel health, visas, documentation, safety and useful addresses." Recommended. (Grant)
Led by special operations veterans, Stanford Medicine affiliated physicians, paramedics and other travel experts, Ripcord is perfect for adventure seekers, climbers, skiers, sports enthusiasts, hunters, international travelers, humanitarian efforts, expeditions and more.
Ripcord Rescue Travel Insurance™ combines into a single integrated program the best evacuation and rescue with the premier travel insurance coverages designed for adventurers and travel is covered on motorcycles of all sizes.
(ONLY US RESIDENTS and currently has a limit of 60 days.)
Ripcord Evacuation Insurance is available for ALL nationalities.
What others say about HU...
"This site is the BIBLE for international bike travelers." Greg, Australia
"Thank you! The web site, The travels, The insight, The inspiration, Everything, just thanks." Colin, UK
"My friend and I are planning a trip from Singapore to England... We found (the HU) site invaluable as an aid to planning and have based a lot of our purchases (bikes, riding gear, etc.) on what we have learned from this site." Phil, Australia
"I for one always had an adventurous spirit, but you and Susan lit the fire for my trip and I'll be forever grateful for what you two do to inspire others to just do it." Brent, USA
"Your website is a mecca of valuable information and the (video) series is informative, entertaining, and inspiring!" Jennifer, Canada
"Your worldwide organisation and events are the Go To places to for all serious touring and aspiring touring bikers." Trevor, South Africa
"This is the answer to all my questions." Haydn, Australia
"Keep going the excellent work you are doing for Horizons Unlimited - I love it!" Thomas, Germany
Lots more comments here!

Every book a diary
Every chapter a day
Every day a journey
Refreshingly honest and compelling tales: the hights and lows of a life on the road. Solo, unsupported, budget journeys of discovery.
Authentic, engaging and evocative travel memoirs, overland, around the world and through life.
All 8 books available from the author or as eBooks and audio books
Back Road Map Books and Backroad GPS Maps for all of Canada - a must have!
New to Horizons Unlimited?
New to motorcycle travelling? New to the HU site? Confused? Too many options? It's really very simple - just 4 easy steps!
Horizons Unlimited was founded in 1997 by Grant and Susan Johnson following their journey around the world on a BMW R80G/S.
 Read more about Grant & Susan's story
Membership - help keep us going!
Horizons Unlimited is not a big multi-national company, just two people who love motorcycle travel and have grown what started as a hobby in 1997 into a full time job (usually 8-10 hours per day and 7 days a week) and a labour of love. To keep it going and a roof over our heads, we run events all over the world with the help of volunteers; we sell inspirational and informative DVDs; we have a few selected advertisers; and we make a small amount from memberships.
You don't have to be a Member to come to an HU meeting, access the website, or ask questions on the HUBB. What you get for your membership contribution is our sincere gratitude, good karma and knowing that you're helping to keep the motorcycle travel dream alive. Contributing Members and Gold Members do get additional features on the HUBB. Here's a list of all the Member benefits on the HUBB.
|
|
|


 Linear Mode