7Likes 7Likes
 |

11 Aug 2024
|
 |
Registered Users
Veteran HUBBer
|
|
Join Date: Oct 2016
Location: Dusheti, Georgia
Posts: 209
|
|
Quote:
Originally Posted by turboguzzi

flex hones from ali express cost very little...
fill with mineral oil, do a short, strong break in, then change to whatever full synth or semi you use normally.
dont baby it driving at 50 when breaking in,
load it properly in short bursts, not constant speed. all breaking is for is making the rings seal, you have to load them with pressure. if you go slowly, the new rings will not adapt to the bore.
|
yes, flex hone was also an option, but besides the shipping time, finally decided that being completely inexperienced in this, achieving needed pattern (more or less..) would be easier with sandpaper and slow progress..
simple mineral oil indeed seems a proper alternative of dedicated motorcycle break-in oil, which anyway seems hard (if not impossible) to find locally. thanks a lot for this hint, maybe i'll get mineral oil for bike engine even with matching viscosities.
and indeed looking forward to do that well loaded break-in when time (and parts...) come.
|
11 Aug 2024
|
 |
Registered Users
Veteran HUBBer
|
|
Join Date: May 2013
Location: Norway
Posts: 1,379
|
|
Quote:
Originally Posted by N67
yes, flex hone was also an option, but besides the shipping time, finally decided that being completely inexperienced in this, achieving needed pattern (more or less..) would be easier with sandpaper and slow progress..
simple mineral oil indeed seems a proper alternative of dedicated motorcycle break-in oil, which anyway seems hard (if not impossible) to find locally. thanks a lot for this hint, maybe i'll get mineral oil for bike engine even with matching viscosities.
and indeed looking forward to do that well loaded break-in when time (and parts...) come.
|
Sad to hear you are stuck again and summer almost gone... Honing with sandpaper? If you doing this again atleast buy honing brush!
https://www.staypro.no/maskiner-verk...oaAjiTEALw_wcB
|
12 Aug 2024
|
|
Registered Users
Veteran HUBBer
|
|
Join Date: Oct 2016
Location: Dusheti, Georgia
Posts: 209
|
|
Quote:
Originally Posted by xtrock
|
generally, i don't ride during jan-feb, so still looking forward to nice autumn rides.
and thanks for the link; let's see what/when i'll have to hone after this, but will consider dedicated tool for that.
|
12 Aug 2024
|
|
Registered Users
Veteran HUBBer
|
|
Join Date: Feb 2012
Location: Milan, Italy
Posts: 627
|
|
i understand that life situation poses some challenges, but not sure your engine will understand.... your DIY hone might or might not work, we dont even know what grit you used, if it was emery cloth or plain sand paper and even if i knew, i could never tell if it'll work
in my 45 year of wrenching, I never did it by hand, neither heard about anyone doing it. draw your own conclusions
your motor, your choice.
By the way, if you use google translate on xtrock's link, you will even see the are noting all the paramters to reach good honing,
regretfully, that link goes up only to 60mm bore, youll need bigger than that of course
this ones are also cheap and adapt to any bore
https://www.youtube.com/watch?v=lSqgJh0Ed5o
|
12 Aug 2024
|
|
Registered Users
Veteran HUBBer
|
|
Join Date: May 2013
Location: Norway
Posts: 1,379
|
|
Quote:
Originally Posted by turboguzzi
i understand that life situation poses some challenges, but not sure your engine will understand.... your DIY hone might or might not work, we dont even know what grit you used, if it was emery cloth or plain sand paper and even if i knew, i could never tell if it'll work
in my 45 year of wrenching, I never did it by hand, neither heard about anyone doing it. draw your own conclusions
your motor, your choice.
By the way, if you use google translate on xtrock's link, you will even see the are noting all the paramters to reach good honing,
regretfully, that link goes up only to 60mm bore, youll need bigger than that of course
this ones are also cheap and adapt to any bore
https://www.youtube.com/watch?v=lSqgJh0Ed5o |
Well i didnt link for him to buy here, it was for him to find correct tool for job, offcourse it will have to be correct size, you write like others are idiots here! You dont get the perfect cross honing with your link, cross honing is what machineshop use so ye buy it. https://www.mscdirect.co.uk/abrasive...ning-tools?p=2
|
13 Aug 2024
|
|
Registered Users
Veteran HUBBer
|
|
Join Date: Oct 2016
Location: Dusheti, Georgia
Posts: 209
|
|
|
well, indeed agree about the risks of not achieving needed finish.
but still had decided that this attempt at least would be better than leaving cylinder wall like it was - with the signs of glazing...
"tool" was plain sandpaper (320) along with the engine oil.
and i do realize that in the scenarios like this at some (increased) extent will have to rely on the crossed fingers..
|
29 Aug 2024
|
|
Registered Users
Veteran HUBBer
|
|
Join Date: Oct 2016
Location: Dusheti, Georgia
Posts: 209
|
|
|
well, meanwhile carbs arrived. as noted earlier, finally decided to try ones from raptor 660 (chinese copies).
first impression was about weight - 200grams more than original kit.
then, about cleanliness - just ok, not super-clean. no big deal since there's lots of studying / tuning times ahead, naturally involving cleanings as well.
Last edited by N67; 30 Aug 2024 at 20:57.
Reason: some details/question are not applicable any more.
|
30 Aug 2024
|
|
Registered Users
Veteran HUBBer
|
|
Join Date: May 2013
Location: Norway
Posts: 1,379
|
|
|
Cant imagine you get any quality that will work over time for 35euros, let us know the fuel consumption, bet its not accurate. I was down to 0,34l 10km last trip with KN filter, fully exhaust Yoshi and stainless downpipes + dynojet kit. Good luck!
Last edited by xtrock; 31 Aug 2024 at 09:28.
|
13 Nov 2024
|
|
Registered Users
Veteran HUBBer
|
|
Join Date: Oct 2016
Location: Dusheti, Georgia
Posts: 209
|
|
 raptor 660 carbs on xt600e
hi everyone
after >3000 kms with new carbs, seems it's already a time to share details and feedback.
on my high-mileage '02 xt600e, original (ydis) carbs became worn and damaged beyond repairability.
considering suggestions by more experienced members, prices, availability and so on, decided to replace damaged carbs with the ones from 660 raptor. although, bought not an oem kit but a chinese clone.
part of the plan was to keep the original airbox on my bike.
let's have a look on general diagram of raptor's carbs:

to compare air ducts and engine intake of xt and raptor, they're more or less the same.
on xt "left channel" (air duct & carb intake - carb output & intake manifold lip) is smaller, compared to the "right channel" (all these members are with bigger diameter).
raptor has (almost) symmetrical channels, with the sizes equal to xt's right, bigger channel.
now differences.
maybe the main point to consider (at least in my personal opinion) is how these carbs work: while xt's ydis setup is somehow a complex (but still nice) combination of slide and cv carbs, raptor has almost identical 2 cv carbs just joined together.
throttle: xt has dual cable setup, while raptor is run by single.
choke: xt (at least my generation) had a pull lever immediately on the carb body, while in the raptor's case it's cable operated.
hoses, vents etc.: raptor's carbs have them a few more and fuel delivery pipe is also with a bigger diameter (8mm as i recall).
dimensions: raptor's kit is heavier, overly taller and wider but shorter (longitudinally, along with intake axis) by 12mm.
partially this shortness is caused by where the intake manifold mating grooves start on raptor's carbs: they start ~3mm closer to the main body, resulting a shorter output lengths, i.e. these carbs don't go into the intake manifolds as deep as xt's carbs.
according to all these differences, here're the lists of modifications on bike and carbs separately.
mods on the bike:- adapter plate, to compensate length - 10mm aluminum between the engine head and intake manifolds. basically, it needs two 30mm holes at the distance of 30 mm, with four 7mm holes for the bolts. plate is glued to the engine head with gasket silicone. in theory, the 8mm plate might also work, making removal/installation of carbs a bit easier but it may stretch air ducts more and create some risk of leak.

- intake manifolds: raptor has asymmetric ports and moreover, manifolds are angled much more, but xt's manifolds work in this way - left one is not useful, instead another right (with bigger diameter) piece is needed. also, since these carbs don't go into the manifolds as deep as the original ydis, manifolds must be shortened - 3mm of the length is cut from the side of the carbs. there's still enough width left for proper band clips. for easier fit, a small (~1mm) tapered slope is cut inside manifold lips.
- air ducts: right one is suitable, left is again small. one option could be to replace it with another right duct, but due to current crazy prices for this part, bought raptor's air duct instead and cut the final few cm on it (carb side). then shortened (~10mm) xt's duct and combined (again silicone) it with the cut part from raptor's duct. luckily, that part from raptor's duct fits perfectly over xt's duct like a sleeve, and considering where to cut, it's possible to achieve a pretty smooth transition between these two rubbers.
- throttle: one cable gets removed, assigned for the choke later.
- choke: found handlebar lever of some quad bike. it appeared pretty easy to attach below the left switch assembly with two screws and also easy to reach and operate by thumb.

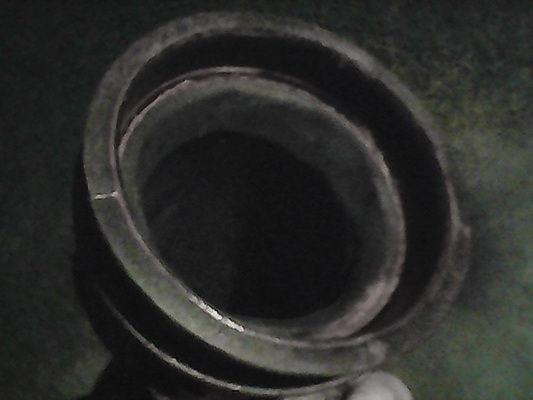
mods on the carbs:- steel tubes of diaphragm vents: they were almost touching the frame, so had to shorten both, now about 8mm is left. attached rubber hoses are with 90° bend immediately at the beginning to go away from the frame. ends of the vents are covered by pieces of breathable textile (yellow ones on the photos below) to make a dust barrier.
- cover plate (#15 on the diagram): had to remove it, as it was making installing the carbs almost impossible.
- main jet protectors (#23): removed them also, just because of the jet kit i had - heads were bigger and not fitting inside those rings.
- cable guides: these new carbs came with 2 of them, but their shape was not suitable. and they were pretty hard to bend properly, so found some softer steel tube, cut 6x1mm thread, bent as needed and pressed instead of old ones. one with 90° bend is for choke. long nuts are useful to adjust free play of cables.

- idle mixture adjustment screws: when carbs are installed, it's nearly impossible to reach and adjust the one on the right. the only way seems to be the combination of good light, tiny concave mirror with a long handle and a small flat screwdriver bit attached to the gimbal ratchet. but even this wouldn't work if i had bit thicker fingers (and the engine hot enough). so special screws with long handles are highly recommended. the ones i've ordered later came without markings. markings are important not only for obvious reason but to be able to check that they don't move.

despite that these new screws came with stronger springs, i've made them a bit lighter by drilling their levers and after installation they're bound with a rubber in ∞ pattern.

installation procedures:
removal/installing carbs on this bike has never been easy, especially with some earlier modifications around.
now with these generally bigger carbs, more hoses (and more about to come after waterproofing with t-joints) and cable guides pointing outside, it's a real challenge. after lots of wrestling in the past and now, i found this way best:

move the airbox as further back as possible, remove the ignition coil, lift or disconnect cables around, detach and lower the rear brake fluid container and remove the right intake manifold, then take carbs out from the right side. when assembling, carbs go back from the same side. first i make sure that both air ducts fit well, then, while the airbox is still back, stick in right intake manifold and tighten the bolts. then it's time to push airbox&carbs forward, twist carbs back and forth until they will go all the way into the manifolds.
in this easy-to-write/read turmoil, every step making the process even slightly easier matters a lot - like each free cubic cm, lubed lips, all band clips in proper positions etc. etc..
although, along with all these dark stuff there's at least one noteworthy benefit: both needles are adjustable without the removal of the carbs, just considering that uncapped carbs don't collect any dust from the frame or cables around.
that's how installed carbs look like from the sides:


when making cable adapters, another important point to consider is that space around them is pretty cramped by the body of the carbs itself, engine and fuel tap:
 now about jetting.
current conditions are following:
oem airbox without snorkel, k&n washable air filter; oem headers with straight aftermarket muffler.
80% of riding is happening at 0-10°c (dry climate), and at 400-1000m altitude.
idle screw is about 3 turns in after touching the plate, rising butterflies maybe 1mm.
idle jets are unchanged, #22.5.
idle mixture screws are at 2.25 turns out.
starter jet (for choke) is #80.
main jets are #140.
jet needles have 6 steps and they're in the second position from below, i.e. raised almost all the way up.
summary and conclusions:
with this setup, the bike starts easily and feels a bit more powerful. fuel consumption is either the same (5.5l/100km) or slightly more.
throttle response is not linear, feels more steep in the beginning and if the throttle is squeezed fast enough, could transform into the step (somewhere around 1/4 of opening). this could happen at sharp deceleration as well, so the solution for now is softening this step with slight clutch input. maybe this is solvable with better tuning.
the only actual problem i had with these cheap carbs is seemingly the shaft moving throttle butterflies could develop some friction-like resistance above 75% of throttle opening (where there's least movement statistically). it still moves but with some unsmooth feelings. cleaning the carbs from inside/outside solves this problem, but it could appear after 1000 or so kms. anyways, will have a closer look on next removal, maybe will attempt to split the carbs as well. only clue for now is that despite being behind the engine, since that protector plate (#15) is removed, the shaft mechanism is more exposed...
generally, i'm pretty happy with this conversion. after ordering these carbs and before actually trying them, i was thinking about them as more or less temporary solution, with a mindset to keep an eye on the web to find some decent original ydis carbs. for now it's changed and seems i'll be happy keeping them as far as they'll be happy doing their job )
of course, i'd like to thank all the forum members helping and supporting me along the way with their advices, infos and ideas, together with people making this forum possible.
p.s. some random fun before and after )
 
Last edited by N67; 13 Nov 2024 at 22:32.
Reason: typography
|
14 Nov 2024
|
|
Registered Users
Veteran HUBBer
|
|
Join Date: May 2013
Location: Norway
Posts: 1,379
|
|
|
Consumption is really high, mine is 3,7L/100km.
|
14 Nov 2024
|
|
Registered Users
Veteran HUBBer
|
|
Join Date: Oct 2016
Location: Dusheti, Georgia
Posts: 209
|
|
Quote:
Originally Posted by xtrock
Consumption is really high, mine is 3,7L/100km
|
well, guess it's partially caused by riding style as well - as remember, used to have <4l/100 km when following a car in smooth/slowish pace.
|
14 Nov 2024
|
|
Registered Users
Veteran HUBBer
|
|
Join Date: May 2013
Location: Norway
Posts: 1,379
|
|
Quote:
Originally Posted by N67
well, guess it's partially caused by riding style as well - as remember, used to have <4l/100 km when following a car in smooth/slowish pace.
|
Yeh offc but i never had that much change even with harder riding. Can you do a test in 80kmh steady riding and see what its at next time you are on a trip?
|
15 Nov 2024
|
|
Registered Users
Veteran HUBBer
|
|
Join Date: Oct 2016
Location: Dusheti, Georgia
Posts: 209
|
|
Quote:
Originally Posted by xtrock
Yeh offc but i never had that much change even with harder riding. Can you do a test in 80kmh steady riding and see what its at next time you are on a trip?
|
yep, would be interesting how will the consumption be on this steady mode. maybe will try on the occasion in flatter side of the country on calm weather.
|
|
Currently Active Users Viewing This Thread: 1 (0 Registered Users and/or Members and 1 guests)
|
|
|
 Posting Rules
|
You may not post new threads
You may not post replies
You may not post attachments
You may not edit your posts
HTML code is Off
|
|
|
|

Check the RAW segments; Grant, your HU host is on every month!
Episodes below to listen to while you, err, pretend to do something or other...

2020 Edition of Chris Scott's Adventure Motorcycling Handbook.
"Ultimate global guide for red-blooded bikers planning overseas exploration. Covers choice & preparation of best bike, shipping overseas, baggage design, riding techniques, travel health, visas, documentation, safety and useful addresses." Recommended. (Grant)

Led by special operations veterans, Stanford Medicine affiliated physicians, paramedics and other travel experts, Ripcord is perfect for adventure seekers, climbers, skiers, sports enthusiasts, hunters, international travelers, humanitarian efforts, expeditions and more.
Ripcord Rescue Travel Insurance™ combines into a single integrated program the best evacuation and rescue with the premier travel insurance coverages designed for adventurers and travel is covered on motorcycles of all sizes.
(ONLY US RESIDENTS and currently has a limit of 60 days.)
Ripcord Evacuation Insurance is available for ALL nationalities.
What others say about HU...
"This site is the BIBLE for international bike travelers." Greg, Australia
"Thank you! The web site, The travels, The insight, The inspiration, Everything, just thanks." Colin, UK
"My friend and I are planning a trip from Singapore to England... We found (the HU) site invaluable as an aid to planning and have based a lot of our purchases (bikes, riding gear, etc.) on what we have learned from this site." Phil, Australia
"I for one always had an adventurous spirit, but you and Susan lit the fire for my trip and I'll be forever grateful for what you two do to inspire others to just do it." Brent, USA
"Your website is a mecca of valuable information and the (video) series is informative, entertaining, and inspiring!" Jennifer, Canada
"Your worldwide organisation and events are the Go To places to for all serious touring and aspiring touring bikers." Trevor, South Africa
"This is the answer to all my questions." Haydn, Australia
"Keep going the excellent work you are doing for Horizons Unlimited - I love it!" Thomas, Germany
Lots more comments here!

Every book a diary
Every chapter a day
Every day a journey
Refreshingly honest and compelling tales: the hights and lows of a life on the road. Solo, unsupported, budget journeys of discovery.
Authentic, engaging and evocative travel memoirs, overland, around the world and through life.
All 8 books available from the author or as eBooks and audio books
Back Road Map Books and Backroad GPS Maps for all of Canada - a must have!
New to Horizons Unlimited?
New to motorcycle travelling? New to the HU site? Confused? Too many options? It's really very simple - just 4 easy steps!
Horizons Unlimited was founded in 1997 by Grant and Susan Johnson following their journey around the world on a BMW R80G/S.
 Read more about Grant & Susan's story
Membership - help keep us going!
Horizons Unlimited is not a big multi-national company, just two people who love motorcycle travel and have grown what started as a hobby in 1997 into a full time job (usually 8-10 hours per day and 7 days a week) and a labour of love. To keep it going and a roof over our heads, we run events all over the world with the help of volunteers; we sell inspirational and informative DVDs; we have a few selected advertisers; and we make a small amount from memberships.
You don't have to be a Member to come to an HU meeting, access the website, or ask questions on the HUBB. What you get for your membership contribution is our sincere gratitude, good karma and knowing that you're helping to keep the motorcycle travel dream alive. Contributing Members and Gold Members do get additional features on the HUBB. Here's a list of all the Member benefits on the HUBB.
|
|
|


 Hybrid Mode