


Our Bike's Story - the Beemerbago
1986, Vancouver, B.C., Canada
On its way to a dealer in Alberta, a brand new 1986 BMW R80G/S, still in the crate, fell off the back of a truck. Really! I was looking for a bike to travel around the world on, and I wanted a deal. A serendipitously timed visit to the then BMW distributor for Canada netted me a somewhat rounded, but brand new bike. For BMW to repair and sell it would have cost some CDN$5,000.00. Not worth it, so they sold it to me at a bargain basement price.
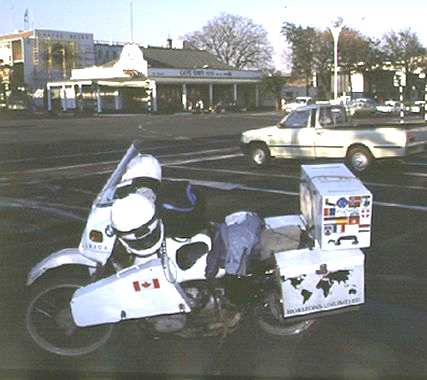
Bike across from the Cairo to Cape Town Bar, Bulawayo, Zimbabwe - 20 August 1997
The only part I replaced with an original BMW part was the left handlebar switch, and that was it. I also replaced the speedometer glass. Of course, there were many parts that were replaced with upgraded or different style parts, but that would have been done even if I had bought a new machine off the showroom floor at 2-3 times the price.
Primary considerations for the trip were ease of maintenance, extreme durability for the anticipated bad roads, security from theft and a tolerance for poor gas.
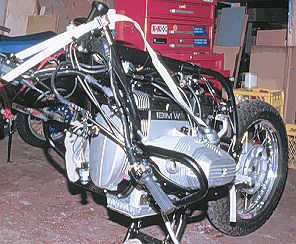
In the beginning...
Stripped down to the good bits - everything that's not there was bent or damaged in some way.
Keith Morrow, of Mongoose Machine and Engineering Ltd., a specialty motorcycle machine shop in Port Moody, B.C., is an old friend of mine, and he very generously gave me complete access to the entire shop and workspace. Keith did all the necessary TIG welding of steel and aluminum, as well as some of the special machining needed to complete the project.
The front fork and lower triple clamp were bent, but not too badly. Despite BMW's admonishment to never straighten these components, years of fork straightening for both of us and BMW's prices for the components left no question: straighten them out!
A San Jose BMW alloy upper triple-clamp and standard BMW fork brace were installed, and 7.5 wt fork oil (mix a bottle of 5 and a bottle of 10!) with Progressive Suspension springs. After Central America, I switched to Works Performance adjustable dual rate springs, which worked better for the load, allowing me to make the switch to the stiffer spring happen sooner or later as I chose.
A Works Performance custom-built shock was used at the rear, with a heavy Honda XL600 spring installed, giving me an easily replaced spring of the requisite stiffness as calculated by Gil Vaillancourt at Works.
BMW rear frame section's are bolted on to the front main frame, and, as on all BMW's, is designed for the factory approved saddlebags with the factory recommended weight of some 15 kg. per bag. And that's it. Any more, and they crack with regularity, and the handling suffers because of excessive flex. For world touring two-up, you need considerably more carrying capacity than the standard rear frame allows. I threw away the rear frame - it was bent anyway - and built a new one from 1" x 1/8" wall mild-steel tubing. I considered all the exotic lightweight metals, and finally settled on plain old mild steel tubing, reasoning that a couple of pounds, and that's all I would have saved, was unimportant compared to ease of repair with rudimentary welding equipment in remote regions. Carefully triangulated and gusseted, it's heavy, but immensely strong.
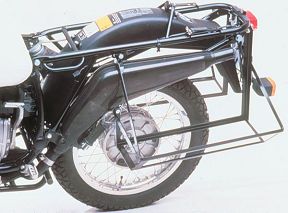
The new left brace is just visible behind the tailpiece of the muffler, heading down behind the muffler, which has a groove bashed into it to fit, down to the cross-brace in the main frame below the swingarm, just behind the footpeg.
The saddlebags are cradled in a steel frame for strength, and mounted on rubber to prevent cracking of the 1/16" aluminum. The brackets bolt to the rear frame at three points, and are crossbraced across the back of the bike to help prevent the side to side waggle of the bags that causes evil handling. (see caption in pic below)
The entire left bag mount bracket and its attendant brace is detachable with the removal of only four bolts to facilitate removal of the rear wheel for tire changes.
All nuts are nylock type, helping to ensure that nothing vibrates loose. To date, at 110,000 km., the rear frame and saddlebag mount bolts have never so much as loosened, and the entire rear frame section and saddlebag mount system is as good as the day we built it.
A local custom luggage company did the basic construction on the saddlebags and top box. Their lead time was such that I had to make cardboard models of the bags, well before the new rear frame was built, and guesstimate all the dimensions.
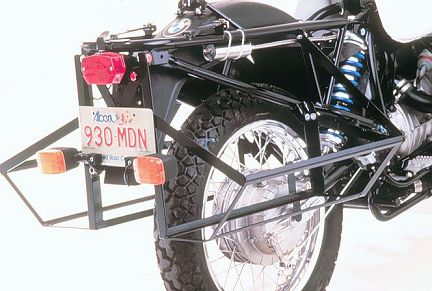
The 1" x 1/4" aluminum x-brace is visible behind the licence plate, tied together by the bolt through the licence plate at the centre of the x. A huge improvement in rigidity of the saddlebags from side to side. Even with all this, there is still some movement, as evidenced by scuff marks on the vertical bar welded to the saddlebag frame at the centre of the rear drive unit, caused by contact with the raised centre part of the drive unit. Makes you wonder how much the standard setup moves!
Susan was parked on the seat, and with the aid of a lot of duct tape and wire, I worked out the dimensions for the bags and topbox. In the end we were pleased to find that we had to make only a couple of minor modifications to the boxes, and they fit fine. The saddlebags remove quickly with a pair of locking latches each, and the top box with four.
One of the problems I have always found with bikes is that you have to carry your helmet and leather jacket with you all the time, as well as cameras when touring. A lot of thought led to an expandable top box. When the bike is parked, we just raise the lid of the topbox, almost doubling its capacity, and height - yes, it looks a little odd! - and padlock helmets and leathers securely inside.
The aluminum boxes, and all the new aluminum parts, were anodized for strength and further resistance to cracking. For coolness in the tropics and conspicuity, the bags and topbox were painted white.
In many third world countries, fuel is difficult to get, so a used 40 litre Heinrich tank was obtained, giving a range at best of 650 km. This proved very useful in Central America, when we were unable to obtain gas in Nicaragua, as the contra war was still on at the time, and with the rationing we would have had to wait two weeks to get 5 litres. We made it right through Nicaragua and into Costa Rica on one tank - barely - it died pulling into the first gas station.
Beneath the tank is an aluminum copy of the BMW exhaust-nut wrench. The large tank intrudes upon the seat slightly, requiring an adjustment in the riding position. One-inch riser blocks reposition the handlebar which required a slightly longer clutch cable. I had Corbin redo the seat with their Dual Canyon design.
Mounted above each cylinder and below the gas tank are a pair of oval black-anodized locking toolboxes, built up from aluminum sheet. This was designed to keep the heavy tools as far forward and low as possible.
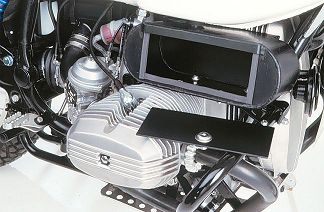
New tool boxes above the cylinder
I wanted an oil-cooler to help the engine survive heavily loaded in the extreme desert heat anticipated. The only oil cooler available at the time was off the R100RS, designed to mount in the center of the fairing behind the front wheel. With the high front fender of the G/S, there was no room, so it had to be mounted higher. Since then, BMW has come out with the R100GS with the cooler mounted on the cylinder protection bars, but I don't like that, as it is very vulnerable to rocks and crash damage there. According to BMW, it is also impossible to mount an oil cooler on the old G/S as the exhaust pipe is in the way of the thermostat. So we moved the exhaust pipe.
Keith and I bent the right exhaust pipe using sand, heat and muscle, and obtained sufficient clearance for the thermostat. The oil cooler itself mounts in front of the frame downtubes, higher up than standard on the street models, and well out of harms way. A standard BMW fiberglass cover was cut and hacked to fit, and a screen was placed on the cover in front of the cooler for protection. Braided stainless steel lines were ordered from a US company to connect the two - a big mistake - the braided lines proved too stiff, causing the cooler to crack in about 3,000 km. Luckily, I had anticipated the failure of the cooler or the lines, and fabricated a small bypass connector to use in case of failure, so no problem, although we were without an oil cooler in most of Central America, where I would have liked it. I originally thought it was a defective cooler, and just replaced the cooler after Central America. Wrong. It failed in about 3,000 km also, in New Zealand. A switch to rubber lines in Australia finally solved the problem.
I used 6061 T6 0.25". aluminum plate to fabricate a larger skid plate than the stock version. The plate is smooth on the bottom to avoid hanging up on rocks, and protects the sump and exhaust pipes. Plenty of holes were drilled to facilitate oil changes and air flow, as well as cut weight - I do think of weight a little bit! It's well scarred now, and has proven it's worth.
The engine is basically stock, though the top-end was carefully inspected and the valves recut. Accel coils have replaced the originals, and the heads were converted for twin spark plugs. A washable two-layer UNI foam air-filter is used for easier maintenance in dusty conditions. Alcohol-proof dual floats were installed in the Bing carburetors as a precaution against questionable fuel.
All of the fill and drain plugs, engine mounts, brake and shift levers have been safety wired, while elsewhere Nylock nuts have been used. Grease nipples were added to the steering head, gearshift pivot and even the sidestand.
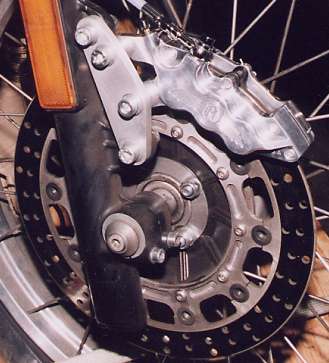
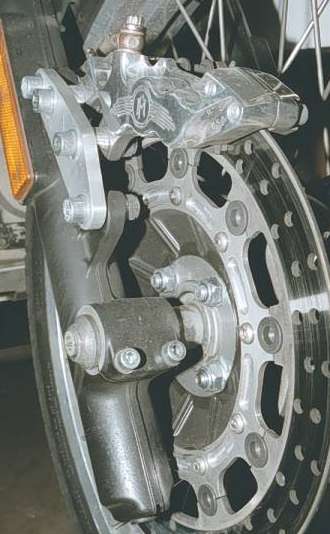
The BMW single front disc is pretty sad two up, especially loaded, but Ferodo pads and a braided-steel brake line were an improvement. Ultimately I gave up on it, and installed a Performance Machine 4 pot caliper on a larger, K100 disk. Braking was very much improved, and pad life was good at one continent per set of pads, but it's still not good enough for stoppies!
May 2002 update: R100GS complete used front end installed, with a M.A.P. Engineering rotor, and Performance Machine 6 pot caliper. Now it stops!
Performance Machine 6 piston caliper and M.A.P. Engineering 320mm disk on R100GS forks.
During the Beemer's bounce off the back of the truck, the headlight shell was crunched, but it wasn't needed after installation of a Parabellum Rifle sport fairing. New anodized aluminum brackets were made for the speedo and dash panel. A 100/65 watt bulb improves the tiny headlight, and curiously, and luckily, the bike came standard with a European ignition switch that allows running without the headlight on, helping the small battery survive long periods at low revs. We rarely ride at nights, it's far too dangerous in most third world countries, but a decent headlight is sometimes useful. I have also since added a high output voltage regulator, as supplied by BMW to the police for low-speed running.
We consider electric vests to be indispensable, so I added a new fuse-box, switches and wiring for two electric vests and gloves. The vests are wired so that we have a choice of low or high heat. Connecting the two vests in series gives about half power to each for low heat, and in parallel for maximum heat. (wiring info available if you are interested - no we don't like the thermostats - expensive, bulky, and questionable reliability over the long haul)
I also rewired the two standard BMW fuses through this box and used standard glass fuses instead of the ceramic Bosch style.
We also carry a pair of solar panels that attach to Velcro strips on the topbox cover. I use them to recharge batteries for cameras, a Toshiba lap-top commuter and flashlights. In the event of a charging system failure, given a sunny day, the panels will also provide enough juice to run the bike.
The stock universal tread Metzeler Enduro rear tire proved inadequate for the load, especially on the highway, showing a huge rise in pressure when hot, and wearing quickly. A switch to a Metzeler Marathon ME88 120/90-18 has proven very successful, averaging 18-20,000 km. I run the maximum pressure recommended, 49 psi cold, and it goes to about 57 psi hot, which is excellent. The standard Metzeler Enduro front proved fine, but is no longer available, and has been replaced by a Sahara 3 and then a 4, neither of which were as good as the Bridgestone Trail Wing 101 90/90-21 I eventually settled on as the front tire of choice.
May 2002 update: with the R100GS front end and tubeless wheel, also went a Continental 90/90-21 Enduro Pro tubeless front tire. A bear to install, it's VERY stiff, but it feels absolutely planted and handling is excellent. Next we'll see how it lasts.
I have since added front aluminum boxes and an aluminum tank box as well. The increased security, with nothing of value easily stolen from the bike, and an alarm system with perimeter security, provides peace of mind. We walk away and don't worry about the bike, although we are careful where we park it. Even a Kryptonite rear wheel lock, a steering lock, and a Kryptonite cable lock won't stop determined thieves from picking up the whole thing. But they will have to be truly determined, and lots of them - fully loaded, it's not exactly light! Sorry, no, I don't know what it weighs now, though in its packing crate for shipping the total weight is 450 kg. with luggage.
The weakest point has been the rear rim, as it cracks right through at the nipple dimple. I have had to replace two now, getting 30,000 km. approximately per rim. The rear wheel hub also developed cracks once, but I was told, and so far the application of the information has been successful, that the cones under the wheel nuts need to be replaced every third or fourth time off, as they seat too deeply and cause the cracks after they have been used too often. Maybe, maybe not, but there hasn't been any trouble since. Spoke nipple heads also occasionally pulled off the second rim, starting in France, requiring pulling the wheel and tire off to replace it. Annoying but not fatal. The third rim has had no problems, perhaps because when I built the wheel with new spokes and nipples, I was careful to not over tighten the spokes. Or perhaps it will start again with more miles. I also safety - wired the spokes at their junction for added strength on the last rim. As of the 115,000 km. mark, with over 45,000 km. on it now, this latest rear rim has no cracks whatsoever, and only one broken spoke, at the head. I think not tightening the spokes a lot has helped, and I believe the safety wiring probably contributes to the strength, perhaps distributing the stress better.
In the final analysis, the bike handles remarkably well, doesn't wobble, always feels stable - except at very low speeds - and has made it 120,000+unknown km. over 5 continents, and to the ends of the earth, with remarkably little trouble. But that's in the rest of the story...

Global Rescue is the premier provider of medical, security and evacuation services worldwide and is the only company that will come to you, wherever you are, and evacuate you to your home hospital of choice.
Additionally, Global Rescue places no restrictions on country of citizenship - all nationalities are eligible to sign-up! Travel medical insurance is also available, currently the limit is 90 days. (TIP: For Evac insurance - Click Multiple Trips and 365 days to get year long insurance.)
![]()
Ripcord Rescue Travel Insurance™ combines into a single integrated program the best evacuation and rescue with the premier travel insurance coverages designed for adventurers.
Led by special operations veterans, Stanford Medicine affiliated physicians, paramedics and other travel experts, Ripcord is perfect for adventure seekers, climbers, skiers, sports enthusiasts, hunters, international travelers, humanitarian efforts, expeditions and more.
Ripcord travel protection is now available for ALL nationalities, and travel is covered on motorcycles of all sizes! NOTE: Travel medical insurance currently has a limit of 90 days.
Member login
Announcements
Thinking about traveling? Not sure about the whole thing? Watch the HU Achievable Dream Video Trailers and then get ALL the information you need to get inspired and learn how to travel anywhere in the world!
Have YOU ever wondered who has ridden around the world? We did too - and now here's the list of Circumnavigators!
Check it out now, and add your information if we didn't find you.
Are you an Overland Adventure Traveller?
Does the smell of spices wafting through the air make you think of Zanzibar, a cacophony of honking horns is Cairo, or a swirl of brilliantly patterned clothing Guatemala? Then this is the site for you!
Hosted by Grant and Susan Johnson, RTW 1987-1998
Johnson's Home
Who Are We?
The BIKE Story
Press Stories about us
Our "Rules of the Road"
Photo Album 500+ images
"Quick" highlights -
Top 31 photos
Mexico
Central America
New Zealand
Australia
Europe
England
Isle
of Man
Norway
Sweden
Denmark
Germany
Netherlands
Spain
Gibraltar
Africa
Tunisia
Libya
Egypt
Kenya
Tanzania
Malawi
Zimbabwe
Botswana
Namibia
Caprivi Strip
Etosha
Sossusvlei
South
Africa
South America
Argentina
Tierra del Fuego
Chile
Peru
Ecuador
Colombia
Next HU Events
HU Event and other updates on the HUBB Forum "Traveller's Advisories" thread.
ALL Dates subject to change.
2024:
- California: April 18-21
- Virginia: April 25-28
- Germany Summer: May 9-12
- Québec: May 17-19
- Bulgaria Mini: July 5-7
- CanWest: July 11-14
- Switzerland: August 15-18
- Romania: August 30-Sept 1
- Ecuador: August 24-25
- Austria: September 12-15
- France: September 20-22
- Queensland is back! Oct 4-7
- Germany Autumn: Oct 31-Nov.3
- South Africa: November
Add yourself to the Updates List for each event!
Questions about an event? Ask here
HU Achievable Dream is Online
and available now to stream on Vimeo!
ALL 15 chapters of the HU Achievable Dream Guide are available to download on Vimeo!

Binge watch over 18 hours of inspiring, informative and entertaining stories and tips from 150 travellers!
"a cross between entertaining stories, tech tips, and reference guide"
"A timeless introduction to Motorcycle Adventure Travel!"
Originally launched as a 7 DVD set, The Achievable Dream series can now be downloaded anywhere. OVER 18 hours of solid info take up zero space in your panniers. How convenient!
Books

All the best travel books and videos listed and often reviewed on HU's famous Books page. Check it out and get great travel books from all over the world.
NOTE: As an Amazon Affiliate we earn from qualifying purchases - thanks for your help supporting HU when you start from an HU Amazon link!