Go Back   Horizons Unlimited - The HUBB > Technical, Bike forums > Yamaha Tech
Yamaha Tech Originally the Yamaha XT600 Tech Forum, due to demand it now includes all Yamaha's technical / mechanical / repair / preparation questions.
Photo by Ellen Delis, Lagunas Ojos del Campo, Antofalla, Catamarca

I haven't been everywhere...
but it's on my list!


Photo by Ellen Delis,
Lagunas Ojos del Campo,
Antofalla, Catamarca


Like Tree3Likes

Reply
 
LinkBack Thread Tools Display Modes
  #136  
Old 21 Jan 2013
Registered Users
Veteran HUBBer
 
Join Date: May 2012
Location: Lithuania
Posts: 204
No, Jens, it doesn't go away if I let it idle for a while.

It stays frosted (even from the outside of the carb you can see frost buildup), because it is sucking cold air as it idles, and is cooling the carb. If the carburetor-to-cylinder manifolds would be made not of rubber, but metal (aluminum/copper, any good heat conductor) then the carb would heat up from the cylinder's heat.

Here in Lithuania it's not only me who is having such problems: in the Lithuanian enduro club forum people are talking about the same thing. And no one has solutions, unless carb has electric heating, like KTM EXC 300, like this Brand New KTM Carburetor Heating Kit XC XCW 2006 2012 55131003044 | eBay

Maybe you saw me talking about this copper rod/tube a few posts above?
Quote:
Originally Posted by Zergman View Post
Thoughts: take some copper wire/tube/rod (~3-5mm thick), one end of it bend around the exhaust pipe at the cylinder, other end - around carb, so the heated copper rod heats the carb.
And the carb was cleaned last spring, when I was assembling the bike. Even then it was sparkling clean, should be the same now. Never gave me any problems... Until now.

I'm thinking what electric heating could I make... I will need to test how much heat can a light bulb produce. Maybe the simple fix would be a light bulb, or two, in the air filter, producing heat
Reply With Quote
  #137  
Old 21 Jan 2013
BlackDogZulu's Avatar
Registered Users
Veteran HUBBer
 
Join Date: Oct 2008
Location: West Wales, UK
Posts: 753
Zergman, what temperatures are you having? It might help those of us in moderate climates to understand the problem better. My experience of carb icing has been only on cold, damp days (say around 0-3 deg C with high humidity). Strangely, I have never had a problem in really cold weather, perhaps because in this country cold temps usually mean dry air.
__________________
2006 XT660R daily ride, 1994 XT600E about to be reborn, Blog: http://goingfastgettingnowhere.blogspot.com/
Reply With Quote
  #138  
Old 21 Jan 2013
Registered Users
Veteran HUBBer
 
Join Date: May 2012
Location: Lithuania
Posts: 204
When I was riding my bike it was approximately -10C
During day it may get to -7C, during night ~ -17C.
So I would think that moisture in the air should set on trees, etc.

Maybe it's also moisture from the snow, melting when it hits the cylinder and exhaust headers, and evaporates. :confused1:

I've also read that icing may occur even at, let's say, +10C, when gasses (air, petrol...) are sucked, they expand and cool (+something with air speed...), thus frosting the carb. I'm not good at thermodynamics, but that's what I found out through my basic knowledge and research.

When I lived in UK for a month (all October) it actually felt like the air is moist, even when breathing, it "tickled" my lungs, and made me cough more, haha!
Everybody from Lithuania, who visits UK, says the air contains more moisture than here. Hadn't measured the moisture though, can't tell by numbers, only how it felt like.
Reply With Quote
  #139  
Old 22 Jan 2013
BlackDogZulu's Avatar
Registered Users
Veteran HUBBer
 
Join Date: Oct 2008
Location: West Wales, UK
Posts: 753
Carb icing isn't necessarily related to freezing temperatures. As you correctly say, it's to do with the movement of air through the carb. The air/fuel mix drops in pressure as it squeezes through the carb venturi and this causes a sharp drop in temperature. Wikipedia. The same principle keeps your fridge cold. The moisture in the air condenses and freezes onto the carb surfaces and partially blocks the airflow, meaning less power and rough running. It's most common with moist air around 0 to +5 degrees. Below freezing point, the air is usually drier and it doesn't happen as often.
__________________
2006 XT660R daily ride, 1994 XT600E about to be reborn, Blog: http://goingfastgettingnowhere.blogspot.com/
Reply With Quote
  #140  
Old 8 Apr 2013
Registered Users
Veteran HUBBer
 
Join Date: May 2012
Location: Lithuania
Posts: 204
Okay... Long time no updates.

Carb frosting problem wasn't solved this winter.
But I noticed when I'm driving normally on trails/roads in the woods (not full-throttle all the time) the carb isn't frosting (or at least less). Only when I'm on the ice going flat out sideways the carb starts frosting (+snow thrown onto cylinder/headers by the front wheel, melts, evaporates, and the steam is picked up by the air box, later frosts in the carb...).

Front right blinker bulb has burnt out, and I found out that to replace the blinkers completely would be cheaper than to replace all four bulbs (I wanted LED). So I got those 4X 18 LED Motorcycle motorbike Turn Signal Lights Bulbs Indicators Blinker Amber | eBay at 20$. Quite nice, but now I need an electronic blinker relay to compensate for lower power consumption of LED modules. Didn't thought of that when I was buying them... Oh, the modules are a bit rattly inside, not secured very well, so I think pumping in some clear silicone sealant should hold the modules tight. I'll do that later on, when I have some better access to the blinkers.


And finally I got another set of wheels. A bit worse condition on the chrome compared to my old wheels. 150EUR/set including shipping and a gift: aluminum Magura handlebars (seller said it's a very strong set of handlebars, they were very popular in the 90's). I don't know if/when I'll mount those.


And now I am a bit wondering and I need your suggestion...
My original plan was to keep my winter tires on my old "winter" wheels (better chrome) because it's a pain in the ass to fit/take off the tires every season, balance them, etc.; these new (worse) wheels to make my "summer" wheels with MX tires: take them apart zinc plate the spokes, and paint hubs/rims green color of the bike.
And I have almost ready to make my supermoto "road" wheels for good road traction (these will be painted bike's color regardless).

Should I paint my summer MX wheels or not? I thought that mud/sand/small stones can chip the paint and make my work wasted.
My other option is to mount the winter tires on the new worse wheels and mount MX tires on my old better wheels.

What do you think I should do? :confused1:

P.S. I understand that 3 sets of wheels can be a little too much, but you know... I like tinkering with my baby
Reply With Quote
  #141  
Old 19 Aug 2013
Registered Users
Veteran HUBBer
 
Join Date: May 2012
Location: Lithuania
Posts: 204
Well well well... My topic got some moss growing on it, so I need to refresh it

Not much going on with the bike. What's done since the last update?

Bosley stainless steel foot pegs,
"bark buster" handguards,
Replaced the blinkers.

Unpleasant surprise after the last ride: my chain guide broke off it was cracked so it was supposed to happened sooner or later...
Any suggestions on a replacement? I'd prefer some guide which "hugs" the chain, I mean goes around it, rather than just being bolted on one side of the chain... There are some 45EUR ones on Kedo or eBay though...

Picture album (made for Bosley):
ImageShack Album - 13 images


Cheers,
Tadas.

Last edited by Zergman; 15 Oct 2013 at 18:29.
Reply With Quote
  #142  
Old 19 Aug 2013
Registered Users
Veteran HUBBer
 
Join Date: Sep 2012
Location: Middle USA
Posts: 349
Ice in carb

In response to putting light bulbs in the air cleaner, I think they would get cooled too fast to be of any benefit. You need direct contact with the carb throat with a heated wire, maybe pulled from some old heated gloves. Then wrap insulation around. It won't take much constant heat to stop the problem. Just do not overload the charging system. Like I say, heated glove wiring may work as it is engineered heating.
Reply With Quote
  #143  
Old 11 Sep 2013
Registered Users
Veteran HUBBer
 
Join Date: May 2012
Location: Lithuania
Posts: 204
Hey Steve, the light bulbs were just a silly idea which probably would have never worked anyway a mod lower in this post I hope will solve my problems. Keep reading...

Moving on... Still no chain guide.

But, there will be some progress in the performance sector

Due to my spark plug looking "lean but OK (?)" (spark plug chart was here in the forum displayed several times), I decided to make a carb swap, and after talking to Vando (bacardi23) I bought the Raptor 660 carb. It's already shipped to me, was really dirty, but now cleaned and shiny
Raptor 660 intake boots (carb-air box) are in transit, as well as the air filter and billet fuel screws. Unfortunately Vito's jet kit (like Vando's) were discontinued, so unavailable to me. I'll probably need another set of needles and (for sure) will need another set of jets. Those will be bought separately from...somewhere. Not sure yet from where and what sizes.

Choke is different, so I will probably end up buying something like this:
Magura 14AL7 Choke Lever Assembly 0550845 M211524 | eBay
Throttle is also different, with one cable, so I'll probably buy something like this:
Quick Action Throttle Set 1 4 Turn Universal Fits on Road Off Road Bike | eBay
(there was a throttle handle similar to this recently on this forum, but I can't find it!)
Any suggestions are welcome

That's it for now...

And here's some pics. Some screws were changed as old ones were damaged (two M8 in the bottom will also be changed), everything disassembled to the last screw and cleaned. Seals, diaphragms are good, so I haven't changed them...


Reply With Quote
  #144  
Old 15 Oct 2013
Registered Users
Veteran HUBBer
 
Join Date: May 2012
Location: Lithuania
Posts: 204
Sorry guys, long time no updates...

While I'm working I don't have the time to go get the camera, etc., so mostly I take pictures with my phone, if I take pictures at all
But I promise I'll make some HQ pics when tinkering with my bike later on (and I will be, because the carb needs some more adjusting). If you have any specific spots you want to see please feel free to ask, once I'm taking pictures I will show you what you want to see.

I ended up buying:

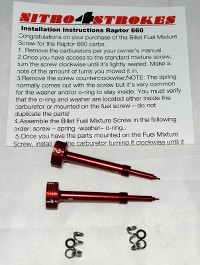
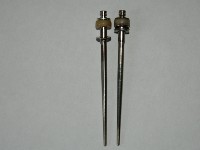
Raptor 660 billet aluminum fuel mixture screws

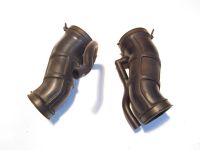
Raptor 660 air ducts

RU-4710 K&N air filter and filter oil + cleaner

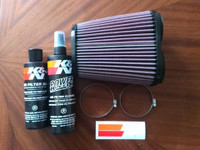
Outwears pre-filter (air filter cover)
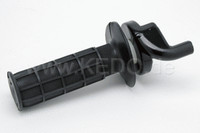
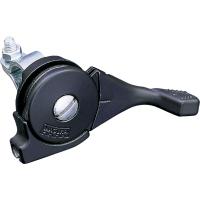
Honda CR throttle handle assembly

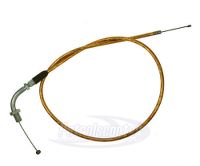
Honda CR throttle cable
Some "pit bike" throttle cable that had a 90 degree bend

Mikuni pilot jets #22.5 and 27.5 (#25 was already installed)
Mikuni main jets from #137.5 to #150 (#165 and #170 was installed)
Mikuni small main jet #80 for choke (#95 was installed)
Magura choke lever


Jet needles were already some after market performance ones, so I was happy I "saved" on them


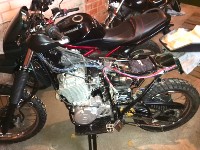
Moving on to the "work" station:

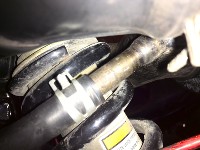
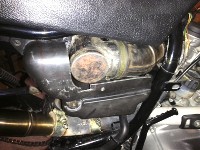
the rubber cylinder head - carb boots were slightly modified, some excess rubber was cut out so that the carbs could go deeper in the boots. I had cut approximately 1-1.5mm, the "rim" that keeps the sealing collars (I guess that's what they are called) from moving too far to the carb side. Not in the pictures, but I'll make some pics later on...
The carb itself was ground down in the places that touched the intake boots, also to make it slide deeper in the boots.
Carb was re-jetted to Vando's specs (#25 pilots, #145 mains and needles on the second (I think) groove with thick plastic shims, which I later changed to #22.5 pilots and #142.5 mains, which are probably too lean... "to be continued").
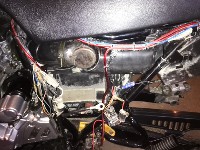
Throttle handle, cable, 90 degree bend (from another cable I bought) were installed.

Choke lever and cable installed (cable was re-used, the one I took the 90deg bend off). The choke cable was shortened, and a cable tip that came with the Magura choke lever was soldered on.


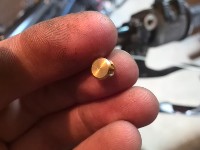
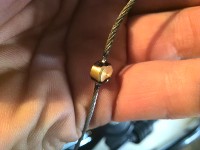
Both carb diaphragm breather pipes were cut, shortened to approximately 1cm, to make more room for the breather hoses so they could clear the frame.
(picture with uncut pipes)


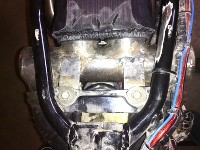
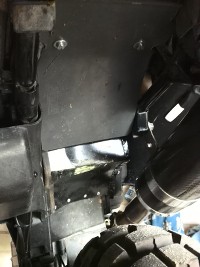
Then came the hard(er) part: how to join the Raptor 660 air filter-carb boots to the air filter? It had to be something simple, yet durable and small enough, so that the air filter is close enough to the carb that it clears the frame tubes. I got the joining part made from a 60mm metal pipe (yeah, I know, not too light, but heck, maybe in the future I'll get it made from aluminum).
It came out great, with two attachments to the original air filter box mounts (the third had to be cut off the frame). It also had a crankcase breather pipe, so my headaches of "where to connect it!?" were finished. And the air filter won't wobble up and down under the seat...


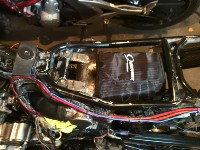
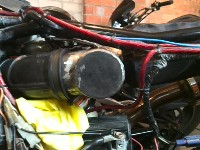
Okay, now I need to cover the air filter and mount the battery somewhere. But where? I thought I might need to make a special mount for the battery, then make the covers from tin metal (very thin sheet metal). But that's a lot of unnecessary work... And a heavy custom part too.
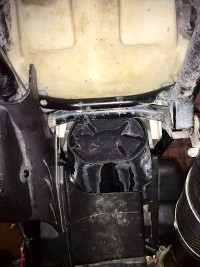
So I took my old air filter box, and started cutting it I butchered it to the point where I had probably less than 60% of it left.
So I saved the battery mount, flasher and fuse mounts, most of the mudguard surface. I also had it clearing the air filter and the metal pipe connector, so all good.


Now I need to fit the seat - I cut it up too.


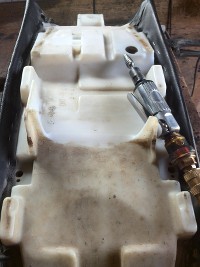
And now I must protect the air filter from all the crap the rear wheel will be throwing at it. So I made a small air filter protector from two bits of tin metal (thin sheet metal). Pop-riveted those two parts together and to the original (cut up) air filter box. Also used a piece of plastic sheet, like 3mm thick, to make a cover that doesn't allow water or mud running under the seat, on the sheet metal "lip", and under the air filter. Looks good


I'm off to the test drive! Whee! 
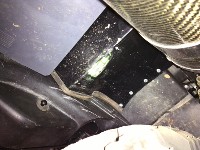
I'm flying towards the forest, off the tarmac to the gravel road - hello potholes! DRRR! And the rear wheel touches the tin metal air filter guard it bent it a little. (see the previous picture - yeah, it's bent a little)
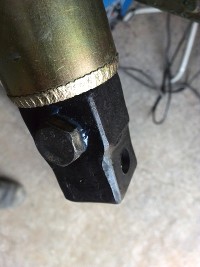
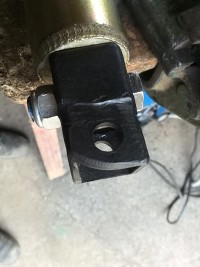
Next day: I straightened it out, re-painted, and had to get the "heckhöherlegung" riser-thingy made. That's what I came up with after welding it from two pieces of scrap metal. The only thing I had to do was to cut off the shock's "spacers" (that tube where the top shock's bolt goes through).
25mm from a hole center to a hole center, gave around 5cm of lift in the back, now I can jump my bike and not worry about bending anything


This carb woke up a new animal, a beast, inside the bike. It pulls very very well, has MUCH more power, although it still needs more adjusting of the carb, which I can't do right away as I have some other more important work to do.
But still, it rides insanely well, and I do not regret doing his modification, even when it cost me around 400€ to complete.

Many thanks to Vando (bacardi23) for sharing the experience in the same mod
Reply With Quote
  #145  
Old 16 Oct 2013
Registered Users
Veteran HUBBer
 
Join Date: May 2012
Location: Lithuania
Posts: 204
Steve, sorry mate, I don't understand what are you talking about :confused1:
Inhibiting the spark...?
Actually my bike runs great now, besides of needing to adjust the carbs a bit.
Can you explain what you meant to say?
Reply With Quote
  #146  
Old 16 Oct 2013
xtrock's Avatar
Registered Users
Veteran HUBBer
 
Join Date: May 2013
Location: Norway
Posts: 1,325
He postet in the wrong thread..
Reply With Quote
  #147  
Old 31 Oct 2013
Registered Users
HUBB regular
 
Join Date: Oct 2013
Posts: 77
Yoshimura Slip-On exhaust muffler for a Yamaha FZR600

Anyone know if this would work on a '93? Thanks
Reply With Quote
  #148  
Old 31 Oct 2013
xtrock's Avatar
Registered Users
Veteran HUBBer
 
Join Date: May 2013
Location: Norway
Posts: 1,325
Just try it, wont do any harm anyway.
Reply With Quote
  #149  
Old 31 Oct 2013
Registered Users
HUBB regular
 
Join Date: Oct 2013
Posts: 77
Pic of exhaust


Thoughts? It's $20.00.
Reply With Quote
  #150  
Old 13 Nov 2013
Registered Users
HUBB regular
 
Join Date: Oct 2013
Posts: 77
Tank Bag that fits

What tank bag have you found that fits well? Tall and skinny, my old one doesn't fit well.
Reply With Quote
Reply


LinkBacks (?)
LinkBack to this Thread: https://www.horizonsunlimited.com/hubb/yamaha-tech/yamaha-xt-600-personalization-64290
Posted By For Type Date
1989 Yamaha Xt 350 Wire Diagram - 2005 Ford E450 Fuse Diagram - hinoengine.tukune.jeanjaures37.fr This thread Refback 21 Jan 2021 11:10

Currently Active Users Viewing This Thread: 6 (0 Registered Users and/or Members and 6 guests)
 

Posting Rules
You may not post new threads
You may not post replies
You may not post attachments
You may not edit your posts

BB code is On
Smilies are On
[IMG] code is On
HTML code is Off
Trackbacks are On
Pingbacks are On
Refbacks are On


Announcements

Thinking about traveling? Not sure about the whole thing? Watch the HU Achievable Dream Video Trailers and then get ALL the information you need to get inspired and learn how to travel anywhere in the world!

Have YOU ever wondered who has ridden around the world? We did too - and now here's the list of Circumnavigators!
Check it out now
, and add your information if we didn't find you.

Next HU Eventscalendar

HU Event and other updates on the HUBB Forum "Traveller's Advisories" thread.
ALL Dates subject to change.

2024:

Add yourself to the Updates List for each event!

Questions about an event? Ask here

HUBBUK: info

See all event details

 
World's most listened to Adventure Motorbike Show!
Check the RAW segments; Grant, your HU host is on every month!
Episodes below to listen to while you, err, pretend to do something or other...

2020 Edition of Chris Scott's Adventure Motorcycling Handbook.

2020 Edition of Chris Scott's Adventure Motorcycling Handbook.

"Ultimate global guide for red-blooded bikers planning overseas exploration. Covers choice & preparation of best bike, shipping overseas, baggage design, riding techniques, travel health, visas, documentation, safety and useful addresses." Recommended. (Grant)


Ripcord Rescue Travel Insurance.

Ripcord Rescue Travel Insurance™ combines into a single integrated program the best evacuation and rescue with the premier travel insurance coverages designed for adventurers.

Led by special operations veterans, Stanford Medicine affiliated physicians, paramedics and other travel experts, Ripcord is perfect for adventure seekers, climbers, skiers, sports enthusiasts, hunters, international travelers, humanitarian efforts, expeditions and more.

Ripcord travel protection is now available for ALL nationalities, and travel is covered on motorcycles of all sizes!


What others say about HU...

"This site is the BIBLE for international bike travelers." Greg, Australia

"Thank you! The web site, The travels, The insight, The inspiration, Everything, just thanks." Colin, UK

"My friend and I are planning a trip from Singapore to England... We found (the HU) site invaluable as an aid to planning and have based a lot of our purchases (bikes, riding gear, etc.) on what we have learned from this site." Phil, Australia

"I for one always had an adventurous spirit, but you and Susan lit the fire for my trip and I'll be forever grateful for what you two do to inspire others to just do it." Brent, USA

"Your website is a mecca of valuable information and the (video) series is informative, entertaining, and inspiring!" Jennifer, Canada

"Your worldwide organisation and events are the Go To places to for all serious touring and aspiring touring bikers." Trevor, South Africa

"This is the answer to all my questions." Haydn, Australia

"Keep going the excellent work you are doing for Horizons Unlimited - I love it!" Thomas, Germany

Lots more comments here!


Five books by Graham Field!

Diaries of a compulsive traveller
by Graham Field
Book, eBook, Audiobook

"A compelling, honest, inspiring and entertaining writing style with a built-in feel-good factor" Get them NOW from the authors' website and Amazon.com, Amazon.ca, Amazon.co.uk.


Back Road Map Books and Backroad GPS Maps for all of Canada - a must have!

New to Horizons Unlimited?

New to motorcycle travelling? New to the HU site? Confused? Too many options? It's really very simple - just 4 easy steps!

Horizons Unlimited was founded in 1997 by Grant and Susan Johnson following their journey around the world on a BMW R80G/S.

Susan and Grant Johnson Read more about Grant & Susan's story

Membership - help keep us going!

Horizons Unlimited is not a big multi-national company, just two people who love motorcycle travel and have grown what started as a hobby in 1997 into a full time job (usually 8-10 hours per day and 7 days a week) and a labour of love. To keep it going and a roof over our heads, we run events all over the world with the help of volunteers; we sell inspirational and informative DVDs; we have a few selected advertisers; and we make a small amount from memberships.

You don't have to be a Member to come to an HU meeting, access the website, or ask questions on the HUBB. What you get for your membership contribution is our sincere gratitude, good karma and knowing that you're helping to keep the motorcycle travel dream alive. Contributing Members and Gold Members do get additional features on the HUBB. Here's a list of all the Member benefits on the HUBB.


All times are GMT +1. The time now is 00:38.