 |
|

14 Jun 2009
|
 |
Registered Users
Veteran HUBBer
|
|
Join Date: Oct 2008
Location: West Wales, UK
Posts: 753
|
|
|
Clutch adjustment
XT600E, 3TB. I've been having trouble finding neutral recently, and there seems to be quite a bit of drag from the clutch, even with the lever pulled all the way in. I've adjusted the cable to the point where there is no free play at all, but the drag is still there. Tonight I took off the RH engine cover and tried to adjust the clutch with the adjuster in there. I seem to remember someone on this site mentioning the procedure (but I can't find the post) which said to loosen the locknut and screw the adjuster in until resistance is felt, back off quarter of a turn and lock up again. I did this, and the problem is now ten times worse! With the correct free play at the lever, it won't go into gear at all (stalls the engine), and if I tighten up the cable enough to get it into gear, I can release the lever all the way and there is no drive. Obviously I have cocked this up big time. The manual talks about marks on the push-lever and crankcase, but I can't see them on my model (manual is for 1990, my bike is 1995). If they are there, they are underneath the starter motor, and the manual doesn't mention removing this. The bike has done 20k miles, so the clutch may well be worn out, but I though that would lead to slip rather than drag.
Anyone care to post a simple step-by-step procedure for this idiot to follow?
|
16 Jun 2009
|
 |
Registered Users
Veteran HUBBer
|
|
Join Date: Sep 2007
Location: XXX<-Portugal->Azores->Santa Maria (island)
Posts: 1,544
|
|
|
That happened to me when I put the kickstart on my '90 XT600E....
DID YOU LOOSE THE METAL SPHERE THAT IS INSIDE THE CLUTCH SHAFT HOLE????
you have to leave a little clearance on the butterfly screw because when you put oil in the bike and it fills the case it'll tighten things up a bit!
REMEMBER, LEAVE THE CLUTCH LEVER adjustment thingy half way! because you might have to either tighten it or release it a little when the oil has filled the clutch case!
|
16 Jun 2009
|
|
Registered Users
Veteran HUBBer
|
|
Join Date: Oct 2008
Location: West Wales, UK
Posts: 753
|
|
|
I didn't dismantle anything, so nothing was lost from inside the mechanism. All I have done is loosen off the locknut in the centre of the clutch plate and tighten the adjuster in the middle. What seems to have happened is that I have lost the range of adjustment, so that when the lever is in, it's not fully in (clutch dragging), but when it's out, it's not fully out (no forward movement of the bike).
The manual (1990) talks about lining up two marks on the clutch operating arm and the crankcase, but I can't see these on my engine, even with the clutch cable off. Either they are not there, or they are hidden under the starter motor. The mechanism seems to be different from the manual. If I could get hold of a 1995 manual I'd be fine!
Thanks for your help.
|
16 Jun 2009
|
|
Registered Users
New on the HUBB
|
|
Join Date: Mar 2006
Location: Turkey/Ýzmir
Posts: 14
|
|
|
We have two bikes here with same problem.Both of them have low miles on the clock so we didnt think that the clutches were worn.
There is no mechanical problem in the clutch but tyre keeps turning even you pull the lever fully.So you cant switch to neutral and gear cahnges are very noisy and hard.
We opened the clutch bowl and saw that they are not worn,still remaning their original thickness but the clutch pad's surface is looking very shiny.So they stick to clutch metal discs and have drag when you even release the pressure on the clutch.
Then changed the pads with the new ones,all the problem is gone,running smooth as never did.
|
16 Jun 2009
|
|
Registered Users
Veteran HUBBer
|
|
Join Date: Oct 2008
Location: West Wales, UK
Posts: 753
|
|
Thanks Sinan. The screws and casings suggest the clutch has never been changed so, although it has only done ~20k miles, it is 14 years old and may well have deteriorated.
So if I renew the clutch (looks like 100GBP - ouch), what is the method for adjusting the new clutch after installation? I'm talking about that screw and locknut in the clutch centre again 
Cheers
|
17 Jun 2009
|
|
Registered Users
Veteran HUBBer
|
|
Join Date: Sep 2007
Location: XXX<-Portugal->Azores->Santa Maria (island)
Posts: 1,544
|
|
DO YOUR HOMEWORK BEFORE BUYING PARTS! 
If you do go for one of those 100quid clutch you are insane man lol sorry 
There are a lot of bikes that use all those same clutch parts as the XT... I will be making a list and posting it here for info!
Meanwhile, What I was saying and you didn't understand me was that.. in order to adjust the clutch on the inside of the engine you have to remove the clutch plate springs and clutch plate just to get to the adjuster (which I mentioned as the butterfly nut)!
INSIDE, where that butterfly nut fits into that axle, THERE IS a metal sphere. If you loose it, byebye clutch!
One thing I can say is, before you go and blow your engine cover gasket, PUT SOME GREASE on the casings!
It will allow you to fit the gasket easier because it holds it in place AND you won't damage the gasket when removing the casings to adjust your clutch!
Wait a couple of hours and I'll have the list here for all of us!
Vando
|
17 Jun 2009
|
|
Registered Users
Veteran HUBBer
|
|
Join Date: Oct 2008
Location: West Wales, UK
Posts: 753
|
|
Hey, Vando, I'd be very interested to see the list of bikes that use the same clutch parts. I was advised that the EBC heavy duty clutch kit was the one to have, but maybe not ...
Just to be clear: I haven't dismantled the clutch at all, just removed the RHS engine cover. There is a locknut in the centre of the clutch plate and the shaft in the middle has a slot in it, a bit like a screw-and-locknut tappet adjuster. I loosened the locknut and adjusted the screw in about 2 turns, up to feeling resistance and back 0.25 turn, locked the locknut and reassembled. That is all I did, and it changed the clutch action from slightly draggy to f***ing impossible. Right now, if someone could tell me how to get the clutch back to how it was before I would be happy! It was quite useable, just a bit clunky. Also, if I fit a new clutch kit, the manual says the final operation is to "adjust the clutch according to the adjustment procedure", and I am no better off.

I'm sure there is a very easy way to do this, but my manual looks as if it is describing a different mechanism.
Thanks for the advice!
|
17 Jun 2009
|
|
Registered Users
Veteran HUBBer
|
|
Join Date: Apr 2003
Location: Manchester UK
Posts: 235
|
|
Hi there BDZ
I'm taking a shot in the dark here but I cant think it can be anything else if no mechanical work has taken place.
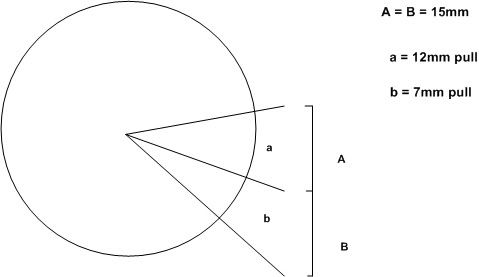
Have a look at the angle the "clutch actuating arm" [description not formal name] is at. You know the one at the end of the clutch cable that goes into the crank casings.
What angle is it at relative to the direction of cable pull?
Have a look at the diagram I quickly drew up and you'll see that because the pull acts on a radius rather than linear there is a reduction in travel the greater the angle. Could this be your problem? It sounds like this is what your manual is trying to refer you to.
|
17 Jun 2009
|
|
Registered Users
Veteran HUBBer
|
|
Join Date: Sep 2007
Location: XXX<-Portugal->Azores->Santa Maria (island)
Posts: 1,544
|
|
i'm still making the list... you can't imagine how many yama bikes use them! lol some models I haven't even heard about them 
When I assembled the kickstart mechanism on my XT600E I messed up the clutch and it happened exactly what happened to you...
What I did to readjust the clutch back to normal was to:
1- Set the Clutch Lever adjuster to midway (on the handlebar)
2- remove the clutch pressure plate springs
3- remove the pressure plate
4- remove all the friction plates
5- change the order of the friction plates and flip some of them (just do it trust me,it'll give you a few more 1000 miles)...be carefull as there are TWO plates that look the same as the others but really they aren't, they have bigger inner width...
6- change the position of the butterfly nut
7- refit the butterfly nut but don't tighten it YET
8- refit the clutch pressure plate---- on this step there is only ONE position that will let the pressure plate go fully into place! just rotate it until you find the right place...ya only got five options so, it's easy!
9- refit the clutch pressure plate springs (do not over tighten them or they WILL brake...trust me, it happened to me lol)
10- adjust the butterfly nut so it feels tight and just give it ONE turn loose and tighten the nut and counter nut on the outside of the pressure plate so it won't move.
NOW try your clutch lever and see if you can engage first and second just by shaking the bike a lil back and forth and disengage to! lol
Do it #10 until it feels good and firmly tighten those last nut and counter nut!
Do leave a small gap here in this last step as the final adjustment will be made at the clutch lever on the handlebars!
If ya want I can put an image of the parts diagram to help out..
Vando
|
17 Jun 2009
|
|
Registered Users
Veteran HUBBer
|
|
Join Date: Jul 2001
Location: Bmth, UK
Posts: 148
|
|
|
clutch adjustment
Hi Richard,
as Bruken has shown on his picture its important to adjust the bit in the middle of the cluth pressure plate from the correct starting point.

not sure which side of the engine the clutch cable goes on your bike? but the arm it pulls should have a pointy bit or mark, which lines up with a mark in the crankcase below it.
its very hard to see the mark on my bike and I wasn't very exact first time I did mine and it dragged. I ended up taking it all apart again looking harder and lining up the marks properly and then adjusting the rod to pressure plate in order to get it to work.
all the above is relevant if its the same as older bikes, if not then its all bo**ocks and no help whatsoever.
|
18 Jun 2009
|
|
Registered Users
Veteran HUBBer
|
|
Join Date: Oct 2008
Location: West Wales, UK
Posts: 753
|
|
|
Lots of good stuff here!
Bruken: can't see your picture but what you say makes sense. Nothing has been altered apart from the centre screw adjustment, and it looks as though the leverage ratio has been changed, so that the full movement of the clutch lever no longer takes the clutch from fully out to fully in. Will investigate that at the weekend.
Bacardi23: I don't want to dismantle the entire clutch unless I have to, but thanks for the advice on the clutch plates. I will follow what you say if I have no luck with adjusting the actuating lever.
Lamin: that picture is the thing I have been looking at! The clutch cable comes in from the left, behind the starter motor, and engages a slot in a lever which is set into the crankcase beneath the starter motor. The cable turns the lever, which moves the clutch rod (I guess). The manual talks about a mark on the cable/arm and a matching mark on the crankcase, but if they are there, they are hidden underneath the starter motor, and the manual doesn't mention removing that. I've been in there with a torch and mirror, but it's all too tight in there to see anything. Perhaps I should just look harder. Not bollocks at all, and very helpful!
Many thanks to all for taking the time to reply. I have Friday and the weekend off work, so I will get down to it then and report back.
|
18 Jun 2009
|
|
Registered Users
Veteran HUBBer
|
|
Join Date: Apr 2003
Location: Manchester UK
Posts: 235
|
|
|
|
18 Jun 2009
|
|
Registered Users
Veteran HUBBer
|
|
Join Date: Oct 2008
Location: West Wales, UK
Posts: 753
|
|
Hehe - I'm at work and that site is blocked!
Will try tonight, thanks.
|
19 Jun 2009
|
|
Registered Users
Veteran HUBBer
|
|
Join Date: Jul 2001
Location: Bmth, UK
Posts: 148
|
|
|
XT600 clutch adjust
Quote:
Originally Posted by BlackDogZulu

Lots of good stuff here!
The manual talks about a mark on the cable/arm and a matching mark on the crankcase, . I've been in there with a torch and mirror, but it's all too tight in there to see anything. Perhaps I should just look harder.
|
if it helps, it looks like this on mine

line em up
then adjust this bit

you can find a set of friction plates for £55, thats what I went for, seem OK so far.
have fun.
|
20 Jun 2009
|
|
Registered Users
Veteran HUBBer
|
|
Join Date: Oct 2008
Location: West Wales, UK
Posts: 753
|
|
Thanks for taking the trouble. I don't think mine looks anything like that, and I certainly can't get a good view of it like that. Here's the view (from the left of the engine):

The clutch cable comes in from the left through a rigid tube to a rubber bellows, and attaches to the operating lever via a keyhole bracket. Here's the same view with the cable removed for clarity:

The bracket that the cable attaches to is in the centre of the pic. It is attached to a lever of some kind to the left, but it is all below the starter motor (on the left). I can't see a way to even get a good look at it without removing the starter motor.
Surely it must be possible to adjust the flippin' clutch without taking half the engine out!
Many thanks for the assistance.

|
|
Currently Active Users Viewing This Thread: 1 (0 Registered Users and/or Members and 1 guests)
|
|
|
 Posting Rules
|
You may not post new threads
You may not post replies
You may not post attachments
You may not edit your posts
HTML code is Off
|
|
|
|

Check the RAW segments; Grant, your HU host is on every month!
Episodes below to listen to while you, err, pretend to do something or other...

2020 Edition of Chris Scott's Adventure Motorcycling Handbook.
"Ultimate global guide for red-blooded bikers planning overseas exploration. Covers choice & preparation of best bike, shipping overseas, baggage design, riding techniques, travel health, visas, documentation, safety and useful addresses." Recommended. (Grant)

Ripcord Rescue Travel Insurance™ combines into a single integrated program the best evacuation and rescue with the premier travel insurance coverages designed for adventurers.
Led by special operations veterans, Stanford Medicine affiliated physicians, paramedics and other travel experts, Ripcord is perfect for adventure seekers, climbers, skiers, sports enthusiasts, hunters, international travelers, humanitarian efforts, expeditions and more.
Ripcord travel protection is now available for ALL nationalities, and travel is covered on motorcycles of all sizes!
What others say about HU...
"This site is the BIBLE for international bike travelers." Greg, Australia
"Thank you! The web site, The travels, The insight, The inspiration, Everything, just thanks." Colin, UK
"My friend and I are planning a trip from Singapore to England... We found (the HU) site invaluable as an aid to planning and have based a lot of our purchases (bikes, riding gear, etc.) on what we have learned from this site." Phil, Australia
"I for one always had an adventurous spirit, but you and Susan lit the fire for my trip and I'll be forever grateful for what you two do to inspire others to just do it." Brent, USA
"Your website is a mecca of valuable information and the (video) series is informative, entertaining, and inspiring!" Jennifer, Canada
"Your worldwide organisation and events are the Go To places to for all serious touring and aspiring touring bikers." Trevor, South Africa
"This is the answer to all my questions." Haydn, Australia
"Keep going the excellent work you are doing for Horizons Unlimited - I love it!" Thomas, Germany
Lots more comments here!

Diaries of a compulsive traveller
by Graham Field
Book, eBook, Audiobook
"A compelling, honest, inspiring and entertaining writing style with a built-in feel-good factor" Get them NOW from the authors' website and Amazon.com, Amazon.ca, Amazon.co.uk.
Back Road Map Books and Backroad GPS Maps for all of Canada - a must have!
New to Horizons Unlimited?
New to motorcycle travelling? New to the HU site? Confused? Too many options? It's really very simple - just 4 easy steps!
Horizons Unlimited was founded in 1997 by Grant and Susan Johnson following their journey around the world on a BMW R80G/S.
 Read more about Grant & Susan's story
Membership - help keep us going!
Horizons Unlimited is not a big multi-national company, just two people who love motorcycle travel and have grown what started as a hobby in 1997 into a full time job (usually 8-10 hours per day and 7 days a week) and a labour of love. To keep it going and a roof over our heads, we run events all over the world with the help of volunteers; we sell inspirational and informative DVDs; we have a few selected advertisers; and we make a small amount from memberships.
You don't have to be a Member to come to an HU meeting, access the website, or ask questions on the HUBB. What you get for your membership contribution is our sincere gratitude, good karma and knowing that you're helping to keep the motorcycle travel dream alive. Contributing Members and Gold Members do get additional features on the HUBB. Here's a list of all the Member benefits on the HUBB.
|
|
|


 Linear Mode


