 5Likes 5Likes
 |
|

19 Oct 2008
|
|
Registered Users
Veteran HUBBer
|
|
Join Date: Jun 2008
Posts: 236
|
|
|
good advice there. the magnets are good but i remember they don't hold true easily. yeah the baja looks great; good luck with the project, don't forget to coat the mild steel (if you use any) as it will rust in no time.
|
19 Oct 2008
|
|
Registered Users
Veteran HUBBer
|
|
Join Date: Apr 2005
Location: Oxford UK
Posts: 2,104
|
|
Here's one I made earlier (about 18 months ago actually) for my CCM. I've previously made two luggage systems for my XR600 and used them trans Sahara so this was done with the benefit of that experience.
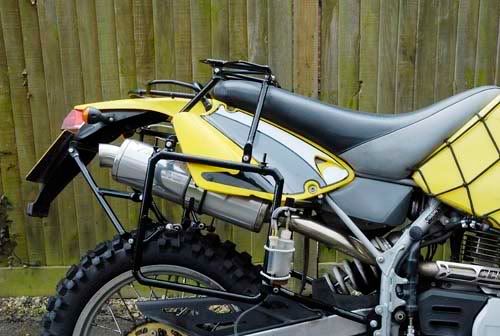
I have welding equipment (and can weld reasonably well), pillar drill, grinder etc but no tube bender so the corners have to be done by cut and shut. The tube is 15mm diam, 1.0mm wall thickness and 12mm /1.0mm for the rack and rear brace. Thinner wall tubing can be tricky to weld without burning through with my diy level mig welder. There is an addition, not in the pic, that goes on the back to support spare tyres that was made from 12mm thin wall tubing from B&Q that I happened to have lying around and that is full of repaired burnthrough holes.
The whole thing (including the rack) weighs in at a bit over 3kg.
The other posts have pretty much covered the construction side but there are a few points I would make:
Cost. If no one make luggage for your bike then you don't have much choice but to make it for yourself but I posted elsewhere on here that it took about 20 hrs construction and set me back over £100 to do this one.
Last minute changes. As soon as I step back and think "right, that's that done" thoughts of altering / improving it crop up. I always want to add more loops for straps, brackets to bolt other stuff to (in this case a 2L fuel reserve bottle and a diy chain oiler), triangulate this and that (just in case). Don't paint it until you've done this bit. Think it through before you take the design to the welder as he'll get pis*ed of with you coming back every 5 mins saying "can you just weld this bracket on here" for the tenth time.
Paint. I used 2K paint on mine as I had the paint, experience and equipment. It gave a great high gloss tough finish (better than the rest of the bike!), but 2K paint can be dangerous to spray and the alternative, rattle can paint, always seems to rust after a few rainy trips. Best bet is powder coating although it's going to cost a bit. You'll really make a mess of it if you want to weld something else on after powder coating.
|
19 Oct 2008
|
|
Registered Users
HUBB regular
|
|
Join Date: Nov 2007
Location: Western, Kentucky
Posts: 56
|
|
backofbeyond, that is one nice rack you have built. Impressive work!
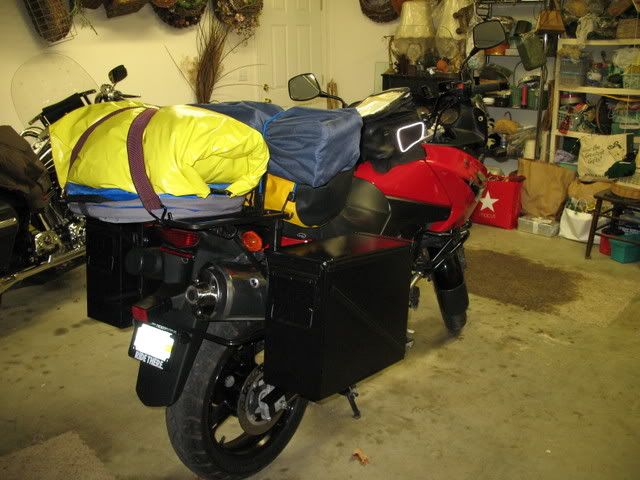
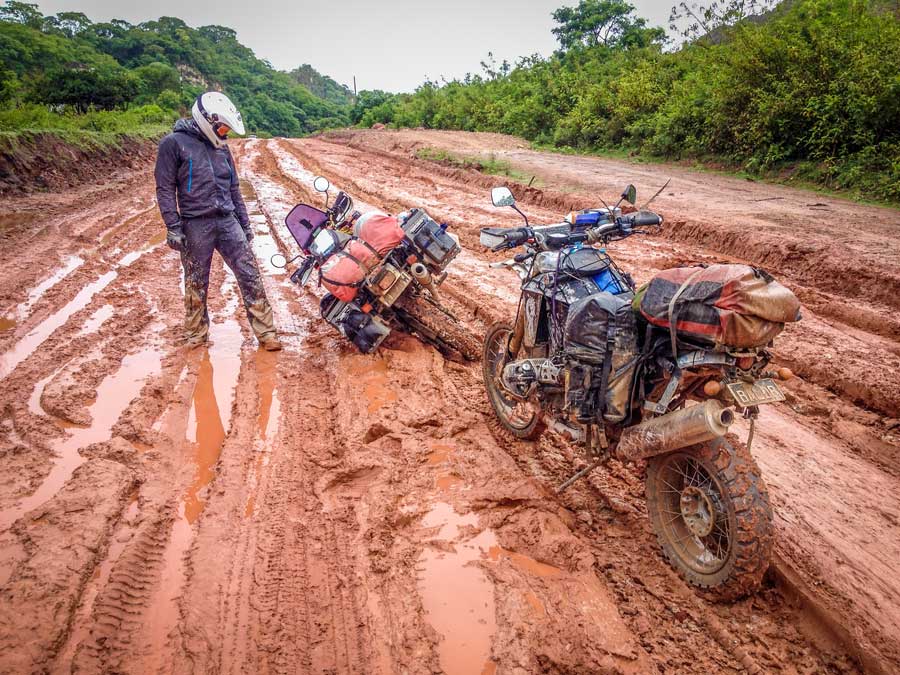
Here are a few more pics of the racks with the cans on, and one with the bike loaded. I added a tool tube that was originally an owners manual tube off a tractor that you can buy at any tractor dealer or tractor supply house.
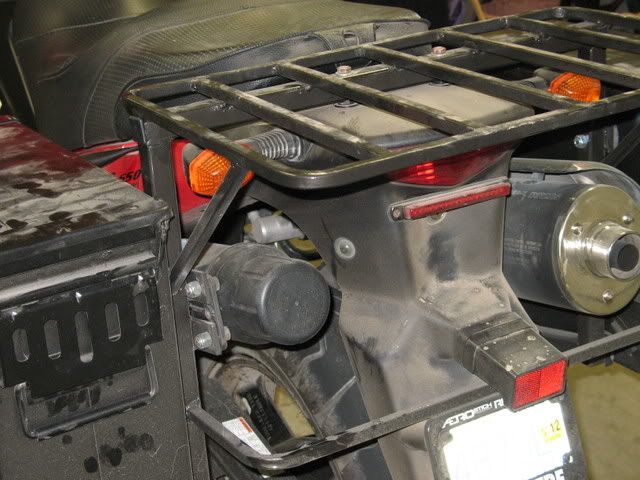
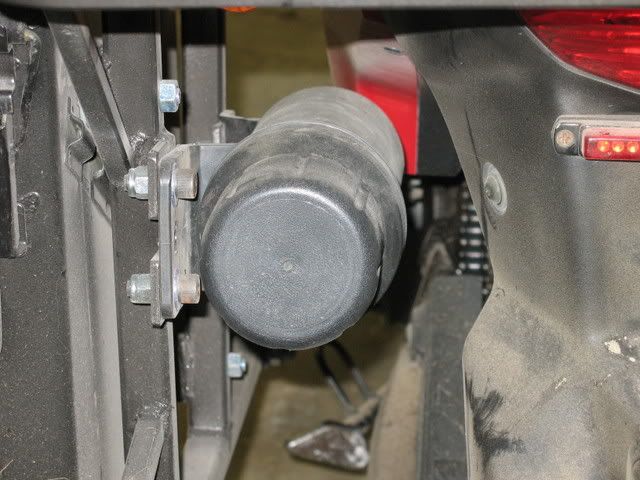
I used the square tubing for the main framing because I had some on hand and it is 1/8" wall thickness. For bending the smaller square tubing I just tacked one end closed and filled it with sand, that way it won't collapse. Then I heated it with a torch and bent it around a small jig I tack welded to my welding table. If everything is done correctly a weld joint should be stronger than the base metal you are welding, so you really don't have to worry about it cracking.
|
21 Oct 2008
|
|
Registered Users
Veteran HUBBer
|
|
Join Date: Jun 2007
Location: On the road
Posts: 121
|
|
|
I was able to get a good quality rustproof paint in a pressure pack when I did mine. If you find some and are going to use it make sure you put 3 or more coats on cos Ive noticed in the areas where I didnt spray enough its started to rust.
Just a note
Crimping the ends of box section tubing is also possible you just have to be sure the seam is on a flat side. Its holding up well on mine.
Ive found those magnets actually effect the arc produced.
Enjoy it and give yourself plenty of time.
Its not a job to rush.
|
21 Oct 2008
|
 |
Moderated Users
Veteran HUBBer
|
|
Join Date: Jan 2006
Location: DogZone Country
Posts: 1,218
|
|

Quote:
Originally Posted by backofbeyond

Here's one I made earlier (about 18 months ago actually) for my CCM. I've previously made two luggage systems for my XR600 and used them trans Sahara so this was done with the benefit of that experience.
I have welding equipment (and can weld reasonably well), pillar drill, grinder etc but no tube bender so the corners have to be done by cut and shut. The tube is 15mm diam, 1.0mm wall thickness and 12mm /1.0mm for the rack and rear brace. Thinner wall tubing can be tricky to weld without burning through with my diy level mig welder. There is an addition, not in the pic, that goes on the back to support spare tyres that was made from 12mm thin wall tubing from B&Q that I happened to have lying around and that is full of repaired burnthrough holes.
The whole thing (including the rack) weighs in at a bit over 3kg.
The other posts have pretty much covered the construction side but there are a few points I would make:
Cost. If no one make luggage for your bike then you don't have much choice but to make it for yourself but I posted elsewhere on here that it took about 20 hrs construction and set me back over £100 to do this one.
Last minute changes. As soon as I step back and think "right, that's that done" thoughts of altering / improving it crop up. I always want to add more loops for straps, brackets to bolt other stuff to (in this case a 2L fuel reserve bottle and a diy chain oiler), triangulate this and that (just in case). Don't paint it until you've done this bit. Think it through before you take the design to the welder as he'll get pis*ed of with you coming back every 5 mins saying "can you just weld this bracket on here" for the tenth time.
Paint. I used 2K paint on mine as I had the paint, experience and equipment. It gave a great high gloss tough finish (better than the rest of the bike!), but 2K paint can be dangerous to spray and the alternative, rattle can paint, always seems to rust after a few rainy trips. Best bet is powder coating although it's going to cost a bit. You'll really make a mess of it if you want to weld something else on after powder coating. |
Neat! I'll have to go and do mine better now!
|
21 Oct 2008
|
|
Moderated Users
Veteran HUBBer
|
|
Join Date: Jan 2006
Location: DogZone Country
Posts: 1,218
|
|
Quote:
Originally Posted by oldbmw
A trick I learned when using round tube, pinch the end a bit rather than try fabricating and welding an angled join on a joint. Also every one welds in a compressive support from teh footrests. but why not a tensive support from on high at aboutthe rear of the fuel tank to the rear bottom edge.
Caminado.. oddly I have a Nordika I bought here also...Nice to weld now without getting shocks  |
Maybe we have an eye for a bargain!
|
22 Oct 2008
|
 |
Contributing Member
Veteran HUBBer
|
|
Join Date: Sep 2003
Location: Whangarei, NZ
Posts: 2,214
|
|
Here is my attempt: Suzuki DR 650 SE pannier rack
I do have to straighten it every time the bike falls over, though!
|
22 Oct 2008
|
|
Registered Users
HUBB regular
|
|
Join Date: Nov 2007
Location: Western, Kentucky
Posts: 56
|
|
|
Looks good beddhist. I like the hinge mount, simple, strong, and quick disconnect. Well done.
|
23 Oct 2008
|
|
Registered Users
Veteran HUBBer
|
|
Join Date: Apr 2005
Location: Oxford UK
Posts: 2,104
|
|
Quote:
Originally Posted by Ironheadziggy76
I like the hinge mount, simple, strong, and quick disconnect. Well done.
|
Having never looked closely at what methods Metal Mule / Touratech etc use to mount boxes onto the frames what have all you diy guys come up with?
I've been using a copy of the old Craven panniers method where two rubber 'cups' on the box sit over upright metal pins on the frame for the top mount
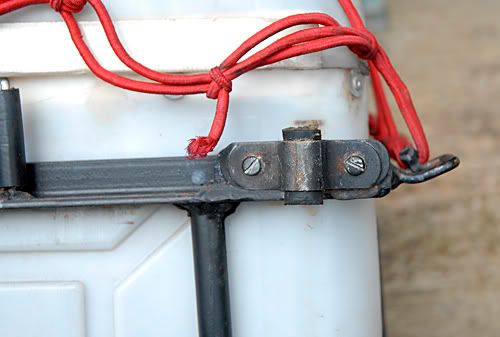

This takes all of the weight but obviously also needs fixing at the bottom to stop it flapping / jumping off and I've used a kind of giant Dzus fastener that I think is genuine Craven stuff that I had lying around.
It's worked well over two Sahara trips (hence the rust!) with no breakages.
Anyone know where I could buy a few more of the bottom Dzus type fasteners? Are they used for anything else? Craven's are long gone so no chance of going back to them
|
23 Oct 2008
|
 |
Registered Users
Veteran HUBBer
|
|
Join Date: Mar 2006
Location: West London
Posts: 920
|
|
|
Just one more quick question
If you don't all mind and thanks for all the great contributions so far, maybe when we're done we can turn this into a guide so it doesn't just fall off the bottom?
It's about the frame to bike mounting "legs". People have said don't use flat plate, which makes sense cos it'd bend, but then you're left with a problem. Anywhere it meets the bike you'll need a bolt, and that means you'll need a flat bit to put that bolt through surely? So are people flattening then ends of their tubes for this, of have you all come up with something I'm not thinking of?
Looking at the picture gives some idea of what I've got to work with (although actually it's not the right bike). On this it'd seem logical to use the existing top box/hand-hold mountings. And it'd make sense to sandwich the side racks under the existing bits. So would just crimping tube be OK? Or would maybe filling the ends and drilling be better?
__________________
Happiness has 125 cc
|
23 Oct 2008
|
 |
Super Moderator
Veteran HUBBer
|
|
Join Date: Aug 2006
Location: Back Down Under (WA)
Posts: 562
|
|
|
bit late?
Sorry if this is too late.. but here is my completely differnt take..
I decided that the entire "loop" design was not the only way (and ugly). As long as you have a 2-3 point fixing than you dont need the "loop" we all just got stuck into that idea..cus it does works but I did not like it... So I looked at different concepts. and Jesse's boxes had a great one.. so i stole it (well kinda, I based mine on it)..
I dont have detailed images of the rack.. I will take some this weekend (i hope) and post em.. but i have posted some picks of the panniers that go with em here
http://www.horizonsunlimited.com/hub...4-6#post200571
you can see how the boxes on the inside are "odd" shapes.. thus the rack was desgined to fit the bike and the the boxes to fit the rack.
Basically i am saying think outside the box.. why go flat and square...
|
23 Oct 2008
|
|
Registered Users
Veteran HUBBer
|
|
Join Date: Apr 2005
Location: Oxford UK
Posts: 2,104
|
|
|
I've not gone for flattening the ends of the tube and drilling because:
Firstly, it looks a mess (IMHO!).
Secondly, there are times when the end of the tube meets the next bit at an angle so you need to both flatten and bend. I've had breaks at this point in past constructions.
Thirdly, with thickish tube unless you've got a big vice (or a big hammer) it can be quite hard to flatten the tube completely.
Welding steel strip to the end of the tube and drilling this for the bolt is what I've done. It
does take forever though if you've lots of little bits that bolt together (as my CCM rack does).
I've no idea what the correct engineering approach is (I trained as a biologist!) but it's worked
so far.
|
23 Oct 2008
|
|
Registered Users
Veteran HUBBer
|
|
Join Date: Jun 2007
Location: On the road
Posts: 121
|
|
Quote:
Originally Posted by beddhist
|
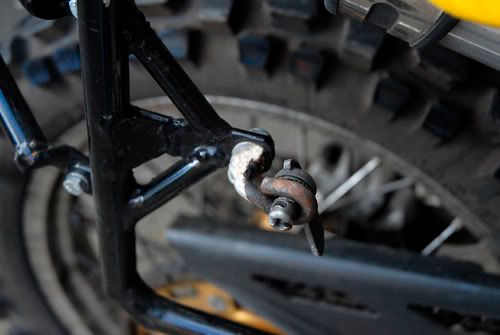
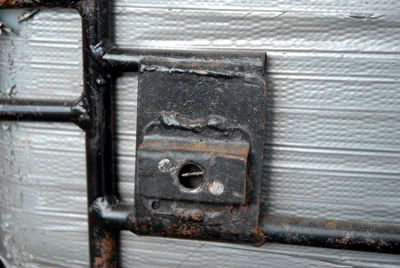
Wow Beddhist.
Your system is very similar to ours.
Only ours isnt using a door hinge just simply 2 flatbar fingers sliding over the ends of a tube under our rear rack.
The securing post connects the whole lot is bent and is secured/locked with the panniers box lid lock.
Amazing we came up with such similar ideas.
We are happy with this method... Very quick and easy to unpack.
N+A
|
23 Oct 2008
|
|
Registered Users
New on the HUBB
|
|
Join Date: Aug 2007
Posts: 5
|
|
I found this somewhere in the net and I have it now in "my favourites"
Maybe in this same HU page.
Sorry but I can't remember.
It is useful anyway
rtw.xtz660 - Home made aluminium boxes
|
23 Oct 2008
|
|
Registered Users
HUBB regular
|
|
Join Date: Nov 2007
Location: Western, Kentucky
Posts: 56
|
|
backofbeyond, here is a link to a company that carries dzus fasteners and others. They are used in aircraft, and auto racing applications just to name a couple. If you check Ebay Harley-Davidson's use these to hold their saddlebags on and you may find some there. My Road King saddlebags set on a lower frame rail and they are attached at the top mount with two dzus fasteners. My Ammo cans are just bolted straight on with a small rubber washer in between the can and frame to keep water out. I used some large fender washers on the inside of the can to spread the load of the fastener. I am going to use stainless steel button head allen bolts with nylon locking nuts for the final installation before I head to Alaska next summer. The button heads will keep things from snagging when loading and unloading.
Southco - DZUS
Alexlebrit, I agree with backofbeyond about attaching a flat plate for your tab to bolt through. Have your welder "slot" your round tubing with a wafer blade attached to an angle grinder and slide your flat plate into it and weld it up. That makes for a very strong attachment point and looks very clean. You can just crush it flat and drill a hole, but sometimes your tubing may get in the way of mounting. I used a heavy piece of round tubing in the mount on mine that attaches under the seat that just has the end flattened and drilled. This is a piece I cut out of a rear crash bar from a Harley-Davidson dresser. It had the end flattened from the factory and the tubing was at least 1/8" thick and looked like it was done in a very large press!
|
|
Currently Active Users Viewing This Thread: 3 (0 Registered Users and/or Members and 3 guests)
|
|
|
 Posting Rules
|
You may not post new threads
You may not post replies
You may not post attachments
You may not edit your posts
HTML code is Off
|
|
|
 Similar Threads
|
| Thread |
Thread Starter |
Forum |
Replies |
Last Post |
|
Luggage Rack
|
BuzzBum |
Yamaha Tech |
3 |
3 Oct 2008 23:58 |
|
H&B Luggage Rack
|
IanW |
KTM Tech |
1 |
8 Nov 2003 17:43 |
|
Luggage Rack XR 600
|
XR Max 600 |
Equipping the Bike - what's the best gear? |
2 |
20 Feb 2003 22:49 |
|
luggage rack
|
Kurt Ellul |
Honda Tech |
1 |
22 Jan 2003 03:15 |
|
luggage rack
|
Kurt Ellul |
Equipping the Bike - what's the best gear? |
1 |
21 Jan 2003 23:44 |
|

Check the RAW segments; Grant, your HU host is on every month!
Episodes below to listen to while you, err, pretend to do something or other...

2020 Edition of Chris Scott's Adventure Motorcycling Handbook.
"Ultimate global guide for red-blooded bikers planning overseas exploration. Covers choice & preparation of best bike, shipping overseas, baggage design, riding techniques, travel health, visas, documentation, safety and useful addresses." Recommended. (Grant)

Ripcord Rescue Travel Insurance™ combines into a single integrated program the best evacuation and rescue with the premier travel insurance coverages designed for adventurers.
Led by special operations veterans, Stanford Medicine affiliated physicians, paramedics and other travel experts, Ripcord is perfect for adventure seekers, climbers, skiers, sports enthusiasts, hunters, international travelers, humanitarian efforts, expeditions and more.
Ripcord travel protection is now available for ALL nationalities, and travel is covered on motorcycles of all sizes!
What others say about HU...
"This site is the BIBLE for international bike travelers." Greg, Australia
"Thank you! The web site, The travels, The insight, The inspiration, Everything, just thanks." Colin, UK
"My friend and I are planning a trip from Singapore to England... We found (the HU) site invaluable as an aid to planning and have based a lot of our purchases (bikes, riding gear, etc.) on what we have learned from this site." Phil, Australia
"I for one always had an adventurous spirit, but you and Susan lit the fire for my trip and I'll be forever grateful for what you two do to inspire others to just do it." Brent, USA
"Your website is a mecca of valuable information and the (video) series is informative, entertaining, and inspiring!" Jennifer, Canada
"Your worldwide organisation and events are the Go To places to for all serious touring and aspiring touring bikers." Trevor, South Africa
"This is the answer to all my questions." Haydn, Australia
"Keep going the excellent work you are doing for Horizons Unlimited - I love it!" Thomas, Germany
Lots more comments here!

Diaries of a compulsive traveller
by Graham Field
Book, eBook, Audiobook
"A compelling, honest, inspiring and entertaining writing style with a built-in feel-good factor" Get them NOW from the authors' website and Amazon.com, Amazon.ca, Amazon.co.uk.
Back Road Map Books and Backroad GPS Maps for all of Canada - a must have!
New to Horizons Unlimited?
New to motorcycle travelling? New to the HU site? Confused? Too many options? It's really very simple - just 4 easy steps!
Horizons Unlimited was founded in 1997 by Grant and Susan Johnson following their journey around the world on a BMW R80G/S.
 Read more about Grant & Susan's story
Membership - help keep us going!
Horizons Unlimited is not a big multi-national company, just two people who love motorcycle travel and have grown what started as a hobby in 1997 into a full time job (usually 8-10 hours per day and 7 days a week) and a labour of love. To keep it going and a roof over our heads, we run events all over the world with the help of volunteers; we sell inspirational and informative DVDs; we have a few selected advertisers; and we make a small amount from memberships.
You don't have to be a Member to come to an HU meeting, access the website, or ask questions on the HUBB. What you get for your membership contribution is our sincere gratitude, good karma and knowing that you're helping to keep the motorcycle travel dream alive. Contributing Members and Gold Members do get additional features on the HUBB. Here's a list of all the Member benefits on the HUBB.
|
|
|


 Linear Mode


